


Local setup shouldn’t be half your job. Aspire promises a single command that spins up your frontend, backend, databases, queues—together—and a built-in dashboard that shows health, logs, and traces across services. In this episode, we run the command, tour the dashboard, and show how it plugs into the stack you already have. Less scavenger hunt, more shipping.


PowerShell gives you powerful tools to manage Microsoft 365. With PowerShell, you automate tasks and gain advanced control over your Microsoft environment. You complete user administration, automate license assignments, and monitor security across your Microsoft 365 tenant with speed and accuracy. PowerShell reduces manual effort, scales with your needs, and helps you handle complex Microsoft 365 management. When you use PowerShell, you unlock new possibilities for Microsoft administration and make your daily work more efficient.
Key Takeaways
- PowerShell automates Microsoft 365 tasks, saving time and reducing manual effort.
- Ensure your system meets prerequisites for PowerShell, including supported operating systems and necessary modules.
- Use the least privilege principle by assigning only necessary roles to maintain security in your Microsoft 365 environment.
- Install essential PowerShell modules like MSOnline and ExchangeOnlineManagement to manage users and services effectively.
- Connect PowerShell to Microsoft 365 using secure methods, such as multi-factor authentication, for enhanced security.
- Automate user management tasks with PowerShell scripts to streamline onboarding and offboarding processes.
- Regularly audit licenses and permissions to ensure compliance and avoid unnecessary costs.
- Utilize community resources and documentation for troubleshooting and expanding your PowerShell skills.
Manage Microsoft 365 with PowerShell: 9 Surprising Facts
- PowerShell can manage almost every Microsoft 365 workload from a single script: Exchange Online, SharePoint, Teams, Azure AD/MSGraph — you can orchestrate cross-service changes in one runbook.
- The Microsoft Graph PowerShell SDK is replacing many legacy modules (MSOnline, AzureAD, ExchangeOnline) and exposes unified Graph API capabilities, enabling richer automation and reporting.
- You can perform cross-tenant and delegated-administrator operations via PowerShell, making managed service provider (MSP) automation and multi-tenant orchestration much more powerful than the GUI allows.
- PowerShell allows large-scale license optimization: you can detect unused or underused seats, reassign or revoke licenses automatically, and save real money with scheduled scripts.
- Microsoft 365 Cloud Shell and the Admin Center’s in-browser PowerShell let you run management scripts without installing modules locally, which is handy for emergency fixes from any device.
- PowerShell provides access to advanced audit, compliance and eDiscovery functions (searches, hold policies, export) that are either limited or unavailable in the portal, enabling automated incident workflows.
- Role-based access control (RBAC) and Privileged Identity Management (PIM) actions can be automated with PowerShell, including just-in-time elevation and entitlement reviews, improving security posture through automation.
- Teams and policy-level automation is deeper than most expect: you can script creation of channels, meeting policies, app permissions, retention rules and bulk user policy assignments to enforce governance at scale.
- Unattended automation is supported securely: modern auth with app-only tokens, certificate-based authentication and managed identities let you run scheduled PowerShell jobs without storing user credentials.
Microsoft 365 Management Prerequisites
Before you start using PowerShell for Microsoft 365 management, you need to make sure your system and account meet the right requirements. This preparation helps you avoid common issues and ensures a smooth experience as you manage your Microsoft 365 environment.
Supported Systems
You can use PowerShell for Microsoft 365 on both Windows and Mac systems. Most users choose Windows 10 or later, but Mac users can also install PowerShell Core. If you use an older version of Windows, you may need to install the Microsoft Online Services Sign-in Assistant. Always check that your operating system supports the latest PowerShell modules for Microsoft 365 management.
Tip: Keep your system updated. Newer versions of PowerShell and Microsoft 365 modules often include important security and compatibility fixes.
Some users encounter compatibility issues, such as assembly dependency conflicts or problems with Web Account Manager (WAM) integration. If you see errors related to WAM when connecting to Exchange Online, try using the DisableWAM switch as a temporary workaround. Avoid using the RunAs option, as it can cause authentication failures.
Permissions and Roles
You need the right permissions to manage Microsoft 365 with PowerShell. Make sure your account has one or more of these roles:
- Global Administrator
- Exchange Administrator
- SharePoint Administrator
- Teams Administrator
You can check your assigned roles in the Microsoft 365 admin center. If you do not have the required permissions, contact your administrator. Using the least privilege principle helps keep your environment secure. Only assign the roles needed for your specific management tasks.
Environment Setup
Setting up your local environment for Microsoft 365 management with PowerShell involves several steps. Follow this checklist to prepare your system:
- Open Windows PowerShell as an administrator.
- Set the PowerShell Gallery as a trusted repository:
Set-PSRepository -Name 'PSGallery' -InstallationPolicy Trusted - If prompted, install the NuGet provider.
- Install the required modules:
Install-Module MSOnline Install-Module -Name AzureAD Install-Module -Name ExchangeOnlineManagement Install-Module -Name Microsoft.Online.SharePoint.PowerShell Install-Module -Name MicrosoftTeams -Force -AllowClobber - Set the execution policy to allow scripts:
Set-ExecutionPolicy RemoteSigned - Confirm changes when prompted.
Note: If you run into assembly dependency conflicts, make sure your modules do not change the global machine state. For persistent issues, contact Microsoft support.
By following these steps, you prepare your system for efficient Microsoft 365 management with PowerShell. This foundation lets you automate tasks, manage users, and secure your Microsoft 365 tenant with confidence.
Installing PowerShell Modules for Microsoft 365
You need the right tools to manage your microsoft 365 environment with powershell. Installing the correct powershell modules gives you access to advanced features for microsoft 365 administration. You can automate tasks, manage users, and control services across your microsoft 365 tenant.
Module Overview
You use several powershell modules to manage microsoft 365. Each module connects to a different microsoft service and provides unique commands. Here are the most commonly used modules:
- MSOnline: Manage users, groups, and licenses in microsoft 365.
- Exchange Online V3: Control mailboxes, distribution groups, and email settings in microsoft 365.
- SharePoint Online: Administer sites, permissions, and content in microsoft 365.
- Teams: Manage teams, channels, and policies in microsoft 365.
You also use the Azure Active Directory module for user and group management. The MicrosoftTeams module helps you control teams and meetings. The ExchangeOnlineManagement module lets you manage mailboxes and email settings. The Microsoft.Online.SharePoint.PowerShell module gives you access to SharePoint sites and permissions.
Tip: Always install the latest version of each powershell module. New versions include security updates and new features for microsoft 365.
MSOnline
You use the MSOnline module to manage users, groups, and licenses in your microsoft 365 tenant. This module helps you automate user creation and license assignments.
Exchange Online V3
The Exchange Online V3 module gives you control over mailboxes and email settings in microsoft 365. You can create, modify, and remove mailboxes with powershell commands.
SharePoint Online
You use the SharePoint Online module to manage sites, permissions, and content in microsoft 365. This module helps you automate site creation and permission changes.
Teams
The Teams module lets you manage teams, channels, and policies in microsoft 365. You can create new teams, add users, and set meeting policies with powershell.
Installation Steps
You install powershell modules for microsoft 365 on both Windows and Mac systems. Follow these steps to set up your environment:
- Download and install the latest powershell package from GitHub.
- On Mac, install OpenSSL using Homebrew:
- Open Terminal and run:
brew update brew install openssl echo 'export PATH="/usr/local/opt/openssl/bin:$PATH"' >> ~/.bash_profile source ~/.bash_profile - Test OpenSSL by typing
OpenSSLin Terminal.
- Open Terminal and run:
- Install the PSWSMan module for powershell:
- Run:
sudo pwsh
Install-Module -Name PSWSMan
Exit
sudo pwsh
Install-WSMan
- Run:
- Install the Exchange Online Management module:
Install-Module -Name ExchangeOnlineManagement - Verify installation:
Get-InstalledModule ExchangeOnlineManagement | Format-List - Install additional modules for microsoft 365 management:
Install-Module -Name Microsoft.Online.SharePoint.PowerShell Install-Module -Name MicrosoftTeams Install-Module -Name AzureAD - On Windows, open powershell as an administrator. Use the
-Scope CurrentUserparameter if you do not have admin rights.
Note: If you see errors about administrative rights or module versions, run powershell with elevated rights. Use the
-Scope CurrentUserparameter to install modules for your user account.
You may encounter warnings about module versions being in use. Identify where the conflicting module is installed with $env:PSModulePath. Uninstall all versions of the module using:
Uninstall-Module -Name PnP.PowerShell -AllVersions -Force
Then reinstall the desired version:
Install-Module -Name PnP.PowerShell
| Module Name | Primary Function | Install Command |
|---|---|---|
| MSOnline | User, group, license management | Install-Module MSOnline |
| ExchangeOnlineManagement | Mailbox and email management | Install-Module -Name ExchangeOnlineManagement |
| Microsoft.Online.SharePoint.PowerShell | SharePoint site and permission management | Install-Module -Name Microsoft.Online.SharePoint.PowerShell |
| MicrosoftTeams | Teams and meeting management | Install-Module -Name MicrosoftTeams |
| AzureAD | User and group management | Install-Module -Name AzureAD |
You now have the powershell modules needed for microsoft 365 management. These tools help you automate tasks and control your microsoft 365 tenant with precision.
Connecting PowerShell to Microsoft 365 Tenant
When you manage your microsoft 365 tenant, connecting powershell to your environment is a key step. You need to choose the right authentication method and follow the correct process for each microsoft service. This section guides you through the main authentication options and shows you how to connect powershell to Exchange Online and sharepoint.
Authentication Options
You have several ways to authenticate when connecting powershell to your microsoft 365 tenant. Each method offers a different balance of security and convenience. The right choice depends on your organization's needs and the sensitivity of your microsoft 365 data.
| Authentication Method | Description | Security Level Comparison |
|---|---|---|
| Multi-Factor Authentication | Requires extra verification beyond a password. | High, especially with Conditional Access. |
| Federated Identities | Allows single sign-on, more secure but needs extra setup. | Very high, but complex to configure. |
| Per-User MFA | Enables MFA for individual users without extra licensing. | Moderate, less control than Conditional Access. |
Interactive Login
Interactive login is the simplest way to connect powershell to your microsoft 365 tenant. You enter your username and password in a pop-up window. If your account uses multi-factor authentication, you also enter a verification code. This method works well for quick tasks or when you do not need to automate scripts.
Secure Credentials
For more secure or automated connections, you can use stored credentials. You save your username and password in a secure variable. Then, you pass this variable to the powershell command. This method helps you avoid typing your password each time. It also supports automation for regular microsoft 365 management tasks.
Certificate Authentication
Certificate authentication gives you the highest level of security. You use a digital certificate to prove your identity to microsoft 365. This method works best for service accounts or automated scripts that manage your tenant. It requires more setup but reduces the risk of password theft.
Tip: Use multi-factor authentication for all admin accounts in your microsoft 365 tenant. This step greatly improves security.
Connect to Exchange Online
You can manage mailboxes, groups, and policies in your microsoft 365 tenant by connecting powershell to Exchange Online. Follow these steps for a reliable connection:
- Update the Exchange Online powershell module to the latest version.
- Set your powershell execution policy to RemoteSigned:
Set-ExecutionPolicy RemoteSigned - Check your network settings. Make sure no firewall or proxy blocks microsoft 365 connections.
- Connect to Exchange Online with this command:
Enter your microsoft 365 admin credentials when prompted.Connect-ExchangeOnline - If you use multi-factor authentication, follow the prompts to enter your verification code.
- For troubleshooting, add the
-EnableErrorReportingflag to collect logs:Connect-ExchangeOnline -EnableErrorReporting - When you finish, always disconnect your session:
Disconnect-ExchangeOnline
Note: If you have issues with Windows Authentication Manager, try disabling it with the
-DisableWAMswitch.
Connect to SharePoint Online
You use powershell to manage sharepoint sites, permissions, and content in your microsoft 365 tenant. The SharePoint Online Management Shell makes this process easy.
- Open the SharePoint Online Management Shell. You can search for "sharepoint" in the Start menu.
- To connect with a username and password, run:
Enter your microsoft 365 password when prompted.Connect-SPOService -Url https://contoso-admin.sharepoint.com -Credential admin@contoso.com - For accounts with multi-factor authentication, use:
Follow the prompts to enter your microsoft 365 account details and verification code.Connect-SPOService -Url https://contoso-admin.sharepoint.com
You now have a secure connection to sharepoint in your microsoft 365 tenant. You can automate site creation, manage permissions, and control content across your 365 environment.
Connect to Teams
You can manage your organization's collaboration and communication by connecting PowerShell to teams. This connection gives you control over settings, users, and policies in microsoft teams. You can automate tasks, create new teams, and monitor activity without using the web interface.
To get started, you need the MicrosoftTeams PowerShell module. This module provides commands for managing teams and their resources. If you have not installed it yet, run:
Install-Module -Name MicrosoftTeams
After installation, you can connect PowerShell to your microsoft teams environment. Use the following command to start the connection:
Connect-MicrosoftTeams
A sign-in window will appear. Enter your admin credentials. If your account uses multi-factor authentication, follow the prompts to complete the process. You now have access to manage teams from your PowerShell session.
Tip: Always use an account with the Teams Administrator or Global Administrator role. This ensures you have the right permissions to manage all teams features.
Once connected, you can perform many tasks. Here are some common actions:
- List all teams in your organization:
Get-Team - Create a new team:
New-Team -DisplayName "Project Alpha" -Visibility Private - Add a user to a team:
Add-TeamUser -GroupId <TeamGroupId> -User user@domain.com - Set a policy for meetings:
Grant-CsTeamsMeetingPolicy -PolicyName "Standard" -Identity user@domain.com
You can also automate bulk operations. For example, you can add multiple users to a team by importing a list from a CSV file. This saves time and reduces errors.
| Command | Description |
|---|---|
| Get-Team | List all teams |
| New-Team | Create a new team |
| Add-TeamUser | Add a user to a team |
| Remove-TeamUser | Remove a user from a team |
| Set-Team | Update team settings |
If you need to disconnect, use:
Disconnect-MicrosoftTeams
This command ends your session and helps keep your environment secure.
Managing microsoft teams with PowerShell gives you speed and flexibility. You can handle large numbers of teams, apply policies, and monitor usage with simple commands. You do not need to click through the web portal for every change. PowerShell makes teams management efficient and reliable.
Essential Scripts for Microsoft 365 Management

User Management
Managing users in your microsoft 365 tenant is one of the most important tasks. You use powershell to create, modify, and report on user accounts. These powershell commands help you automate user administration and keep your environment organized.
Create and Modify Users
You can create new users and update existing accounts with powershell. This process saves time and reduces errors compared to manual entry in the microsoft 365 admin portal. You start by connecting to your tenant and running commands to add or change user details.
To create a new user, use the following powershell command:
New-MgUser -DisplayName "Alex Johnson" -UserPrincipalName "alex.johnson@contoso.com" -AccountEnabled $true -MailNickname "alexjohnson" -PasswordProfile @{ ForceChangePasswordNextSignIn = $true; Password = "P@ssw0rd!" }
You modify user properties with commands like:
Set-MgUser -UserId "alex.johnson@contoso.com" -Department "Marketing" -JobTitle "Marketing Specialist"
You can also reset passwords, update contact information, and enable or disable accounts. These powershell commands give you full control over user accounts in your microsoft 365 tenant.
Tip: Always check user details before making changes. Use
Get-MgUserto review current settings.
Bulk Operations
You often need to manage many users at once. Powershell makes bulk operations easy. You can import a list of users from a CSV file and run commands to create, modify, or remove accounts in your microsoft 365 tenant.
Here is a sample script for bulk user creation:
Import-Csv "C:\Users\newusers.csv" | ForEach-Object {
    New-MgUser -DisplayName $_.DisplayName -UserPrincipalName $_.UserPrincipalName -AccountEnabled $true -MailNickname $_.MailNickname -PasswordProfile @{ ForceChangePasswordNextSignIn = $true; Password = $_.Password }
}
You can also update properties for multiple users:
Import-Csv "C:\Users\updateusers.csv" | ForEach-Object {
    Set-MgUser -UserId $_.UserPrincipalName -Department $_.Department -JobTitle $_.JobTitle
}
Bulk operations help you onboard new employees, update departments, or offboard users quickly. You reduce manual work and ensure consistency across your microsoft 365 tenant.
Note: Always validate your CSV files before running bulk scripts. Mistakes in the file can cause errors in user creation or modification.
You can generate reports to monitor user activity and security. Common powershell scripts include:
- Listing users and their last logon time to find inactive accounts.
- Exporting MFA status for all users to a CSV file.
- Reporting password change dates and expiry.
- Tracking user logon history and activity.
- Removing or disabling inactive users based on last activity.
- Automating user offboarding, including disabling accounts and converting mailboxes.
These scripts help you maintain a secure and efficient microsoft 365 environment.
License Management
Managing licenses in your microsoft 365 tenant ensures users have access to the right tools. You use powershell commands to assign, remove, and audit licenses. This process helps you control costs and maintain compliance.
The following table shows key powershell commands for license management:
| Cmdlet | Description | Example Scenario |
|---|---|---|
| Get-MgUser | Retrieves user information, including assigned licenses. | Audit your user base before major projects, ensuring all users have the necessary licenses. |
| Set-MgUserLicense | Assigns or removes licenses for a user. | Update licenses when employees change roles or need advanced tools. |
| Get-MgSubscribedSku | Lists the subscribed SKUs for the tenant. | Keep an inventory of license entitlements for compliance and management. |
| Get-MgDirectorySubscription | Provides details on the directory's subscriptions. | Audit active subscriptions to maintain only necessary licenses and streamline costs. |
You start by reviewing license assignments with Get-MgUser. You can export this information to a CSV file for analysis. When you need to assign or remove licenses, use Set-MgUserLicense. This command lets you update user access quickly.
You check your tenant's available licenses with Get-MgSubscribedSku. This helps you plan for new hires or changes in your microsoft 365 environment. You audit subscriptions with Get-MgDirectorySubscription to avoid unnecessary costs.
Tip: Regular license audits help you stay compliant and avoid paying for unused licenses.
You can automate license assignments for new users. For example, when you onboard employees, run a script to assign the standard microsoft 365 license:
Set-MgUserLicense -UserId "alex.johnson@contoso.com" -AddLicenses @{SkuId="your-sku-id"}
You remove licenses when users leave or change roles:
Set-MgUserLicense -UserId "alex.johnson@contoso.com" -RemoveLicenses "your-sku-id"
Automating license management with powershell commands keeps your tenant organized and efficient.
Group and Team Management
Groups and teams play a central role in microsoft 365 administration. You use powershell to manage membership, audit access, and monitor activity. These scripts help you control collaboration and security in your tenant.
You can retrieve all groups in your tenant with:
Get-MgGroup
You use Get-UnifiedGroup to find Unified Groups in Exchange Online. For sharepoint sites connected to groups, run:
Get-SPOSite -Template GROUP#0
You audit group membership and guest access with powershell commands. You track changes and monitor for suspicious activity. Teams analytics and sharepoint file sharing scripts help you understand how users collaborate.
Common powershell scripts for group and team management include:
- Auditing group membership to ensure only authorized users have access.
- Tracking guest access to identify external accounts in your tenant.
- Delegating Exchange mailbox access for shared work.
- Monitoring email activity for compliance.
- Analyzing teams usage and sharepoint file sharing.
You benefit from speed and repeatability. Run a single script to update thousands of users. You automate bulk changes and save time. Scripts can be reused for consistent workflows.
Note: Always review group membership and guest access regularly. This practice improves security and keeps your microsoft 365 tenant safe.
Powershell commands for group and team management give you advanced control. You can make large-scale changes, audit activity, and maintain a secure environment. You improve efficiency and reduce manual work in your microsoft 365 administration.
Security Audits
Security audits help you protect your Microsoft 365 environment. You can use PowerShell to check for risks, monitor activity, and keep your data safe. You need to know what happens in your tenant, especially when you manage many users and groups. PowerShell gives you tools to track changes, review access, and find problems before they grow.
Audit Logs
Audit logs show you what happens in your Microsoft 365 tenant. You can use PowerShell scripts to collect these logs and review important actions. This helps you spot suspicious activity, such as unauthorized access or changes to settings.
You can use different methods to monitor and audit PowerShell activity:
| Method | Description |
|---|---|
| PowerShell Scripts | Retrieve admin operation logs from unified audit logs. Export details to CSV for analysis. |
| Azure AD Audit Logs | Track admin actions like user additions and policy updates in the Microsoft Entra admin center. |
| Unified Audit Logs | Access all admin activity records in the Microsoft 365 Purview portal. Download for review. |
| Search-UnifiedAuditLog | Use this cmdlet for detailed searches and automation across Microsoft 365 services. |
You can run scripts to check mailbox admin activities. For example, you can see who accessed a mailbox or changed settings:
Search-MailboxAuditLog -Identity john -LogonTypes Admin,Delegate -StartDate 1/1/2019 -EndDate 12/31/2019 -ResultSize 2000
You can also audit mailbox quota changes:
New-AdminAuditLogSearch -Name "Mailbox Quota Change Audit" -Cmdlets Set-Mailbox -Parameters UseDatabaseQuotaDefaults, ProhibitSendReceiveQuota, ProhibitSendQuota -StartDate 01/24/2019 -EndDate 02/12/2019 -StatusMailRecipients john@example.com
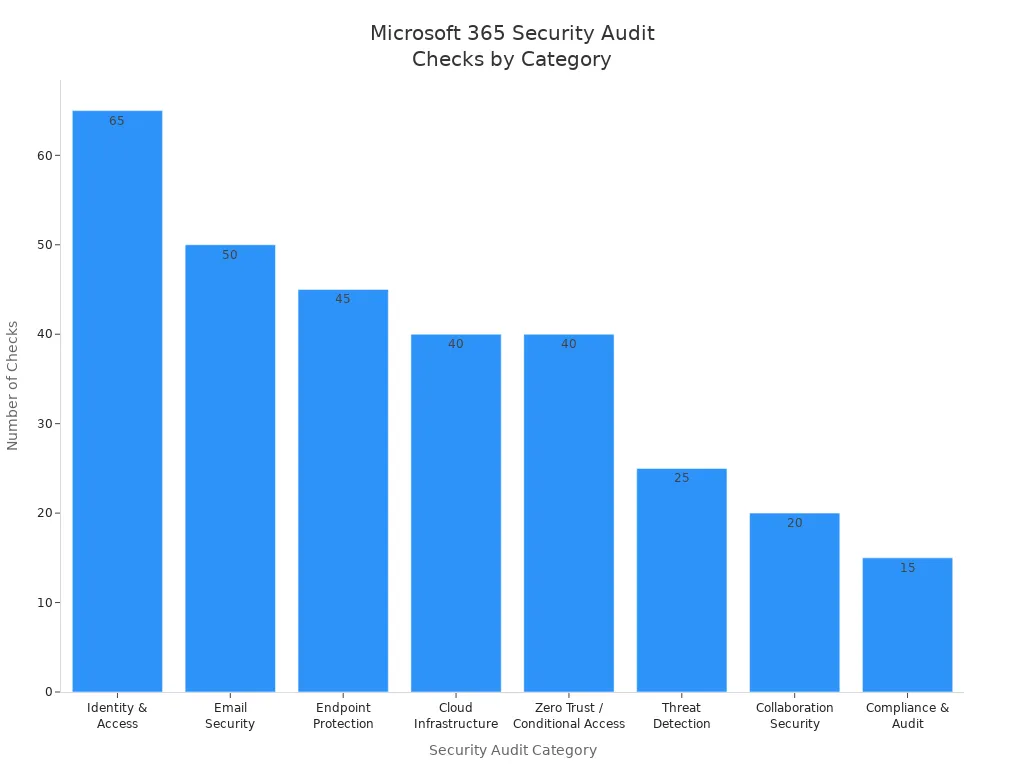
PowerShell helps you check many security areas. You can review identity and access, email security, endpoint protection, cloud infrastructure, and more. The table below shows how many checks you can run in each category and what you gain:
| Category | Checks | Key Benefit |
|---|---|---|
| Identity & Access | 65+ | Stop account compromise before it happens |
| Email Security | 50+ | Block phishing, BEC, and malware attacks |
| Endpoint Protection | 45+ | Ensure only secure devices touch your data |
| Cloud Infrastructure | 40+ | Eliminate Azure misconfigurations |
| Zero Trust / Conditional Access | 40+ | Enforce modern access controls |
| Threat Detection | 25+ | Find attackers hiding in your tenant |
| Collaboration Security | 20+ | Enable sharing without data leaks |
| Compliance & Audit | 15+ | Stay audit-ready, always |
You can also use PowerShell to generate reports for Data Loss Prevention (DLP) policies, mailbox retention, and password expiration. Here are some useful commands:
- DLP policy report:
Get-MailDetailDlpPolicyReport -StartDate 03/01/2019 -EndDate 03/07/2019 - Mailbox retention policy report:
Get-Mailbox -ResultSize unlimited | Format-Table UserPrincipalName,RetentionPolicy,RetentionUrl,RetentionComment,RetentionHoldEnabled,StartDateForRetentionHold,EndDateForRetentionHold - Password never expires report:
Get-AzureADUser -All $true | Select-Object UserPrincipalName,@{ N="PasswordNeverExpires";E={$_.PasswordPolicies -contains "DisablePasswordExpiration"} }
You should run these scripts often. This helps you find risks and keep your users and groups safe.
MFA Checks
Multi-factor authentication (MFA) adds another layer of security for your users. You can use PowerShell to check which users have MFA enabled and who needs it. This helps you protect accounts from attacks.
To check MFA status for all users, you can use:
Get-MsolUser | Select-Object UserPrincipalName,StrongAuthenticationMethods
You can export the results to a CSV file for review. This makes it easy to see which users need MFA. You can also use scripts to remind users to set up MFA or to report on changes.
You should check MFA status for all users, including those in special groups. This keeps your tenant secure and helps you meet compliance rules.
Automation Tasks
Automation saves you time and reduces mistakes. PowerShell lets you automate many tasks in Microsoft 365. You can manage users, update groups, and create reports without doing everything by hand.
Here are some ways automation helps you:
- Streamline user and access management. You can automate user creation, password resets, and group membership changes. This makes onboarding and offboarding faster and more consistent for all users.
- Improve reporting, monitoring, and alerting. You can set up scripts to generate reports on security and compliance. These reports run on a schedule, so you do not need to remember to check them. You get alerts if something changes, which helps you act quickly.
You can use PowerShell to automate these common tasks:
- Add new users from a CSV file.
- Update group membership for many users at once.
- Remove users who no longer need access.
- Schedule regular security audits and export results.
- Monitor mailbox activity and send alerts for unusual actions.
Automation helps you manage large numbers of users and groups. You save time, reduce errors, and keep your Microsoft 365 environment secure.
Tip: Start with simple scripts. As you learn more, you can build advanced automation to handle complex tasks for your users and groups.
Best Practices for Microsoft 365 and PowerShell
Script Organization
Organizing your scripts helps you manage microsoft 365 tasks with less confusion. You should use clear file names and folder structures. Group scripts by function, such as user management or license reporting. Add comments to explain what each part does. This makes it easier for you and your team to update or troubleshoot scripts later. You can also use version control tools like Git to track changes and share scripts safely.
Tip: Store reusable functions in separate files. This lets you call them from different scripts and keeps your code clean.
Error Handling
You will face errors when you manage microsoft 365 with powershell. Good error handling keeps your environment stable and secure. Here are some best practices:
- Use try/catch blocks to handle errors. This lets you take action when something goes wrong.
- Add logging to your scripts. Logs help you track errors and understand why a try block failed.
- Parameterize your scripts. This makes them flexible and easy to use in different microsoft 365 scenarios.
You can see an example of a try/catch block below:
try {
    # Your microsoft 365 command here
}
catch {
    Write-Error "An error occurred: $_"
}
Always test your scripts in a safe environment before using them in your live 365 tenant.
Security
Security should guide every step you take with powershell in microsoft 365. You protect your data and users by following strong security practices.
| Security Measure | Description |
|---|---|
| Script Block Logging | Logs commands and scripts to the Microsoft-Windows-PowerShell/Operational event log. |
| AMSI Support | Sends script blocks to an antimalware scanner to block malicious code. |
| Constrained Language Mode | Limits what commands and .NET types you can use for better security. |
| Application Control | Enforces policies to stop unauthorized code from running. |
| Software Bill of Materials (SBOM) | Lists all components in install packages for better security management. |
| Secure Data Transfer in Remoting | Encrypts SecureString objects during remote powershell sessions. |
You should keep detailed logs of all changes in your microsoft 365 tenant. Track who made changes and when. This helps you find problems and keeps your data safe. Use automated change management to keep your 365 environment consistent and spot configuration drift.
Least Privilege
Always use the least privilege principle. Give users only the permissions they need for their tasks in microsoft 365. This reduces the risk if an account is compromised. Review permissions often and remove extra rights.
Credential Management
Store credentials securely. Never put passwords in your powershell scripts. Use secure methods like Windows Credential Manager or Azure Key Vault. Rotate passwords and secrets on a regular schedule. This keeps your microsoft 365 tenant safe from attacks.
Note: Secure data transfer is important when you use remoting in powershell. Always encrypt sensitive information.
By following these best practices, you make your microsoft 365 management safer, more reliable, and easier to maintain.
Scheduling Automation
Automating your Microsoft 365 management tasks with PowerShell saves you time and reduces errors. You can schedule scripts to run at regular intervals, which helps you keep your environment up to date without manual effort. Choosing the right scheduling method is important for reliability and security.
You have several options for scheduling PowerShell automation in Microsoft 365. The most effective methods use cloud-based tools that work well with modern PowerShell modules. Here are the main approaches:
- Azure Automation: This service lets you run PowerShell scripts in the cloud. You do not need to keep a computer running. Azure Automation supports advanced scheduling, logging, and secure credential management.
- Power Automate: This tool helps you create workflows that trigger PowerShell scripts based on events or schedules. Power Automate works well for simple tasks and integrates with many Microsoft 365 services.
- Windows Task Scheduler: This tool runs scripts on a local machine. However, it has limitations with modern PowerShell modules and cloud authentication. For Microsoft 365 tasks, you should avoid using Task Scheduler and choose cloud-based options instead.
Tip: Cloud-based automation tools like Azure Automation offer better reliability and security than local schedulers.
To use Azure Automation, you start by creating an Automation account in the Azure portal. This account acts as the workspace for your scripts and schedules. Next, you develop a runbook, which is a script that performs your desired task. You can write, test, and edit your runbook directly in the Azure portal.
Before scheduling your runbook, make sure your service principal or managed identity has the necessary permissions in Microsoft 365. This step ensures your script can access the resources it needs. Assign only the permissions required for the task to follow the principle of least privilege.
When your runbook is ready, you set up a schedule. Azure Automation lets you choose how often your script runs—daily, weekly, or at custom intervals. You can monitor the status of each run and review logs for troubleshooting.
Here is a summary of the steps to schedule PowerShell automation with Azure Automation:
- Create an Automation account in Azure.
- Develop and test your PowerShell runbook.
- Assign the correct permissions to your service principal or managed identity.
- Set up a schedule for your runbook.
- Monitor and review logs for each run.
Testing your scripts before scheduling is important. Run your code in the Azure portal to make sure it works as expected. This practice helps you avoid errors and ensures your automation runs smoothly.
Power Automate offers another way to schedule tasks. You can build flows that trigger PowerShell scripts when certain events occur, such as receiving an email or updating a file. Power Automate is user-friendly and works well for straightforward automation needs.
By using these scheduling tools, you keep your Microsoft 365 environment efficient and secure. Automation frees you from repetitive tasks and lets you focus on more important work.
Troubleshooting Microsoft 365 PowerShell Issues
When you manage your microsoft 365 tenant with powershell, you may face errors or unexpected behavior. Knowing how to troubleshoot these issues helps you keep your environment running smoothly. This section guides you through common connection problems, script debugging techniques, and support resources.
Connection Problems
You often encounter connection issues when using powershell to manage your microsoft 365 tenant. These problems can block access to microsoft services or prevent scripts from running. Follow these steps to resolve the most frequent connection errors:
- Check your permissions. Make sure your account has the right roles for microsoft 365 management.
- Confirm your account is licensed for the correct microsoft 365 services.
- Use the correct powershell cmdlets and syntax for your tenant.
- Install the latest version of the Azure AD powershell module.
- If your account uses multi-factor authentication, set up a password credential for authentication.
Tip: Always update your powershell modules before connecting to your microsoft 365 tenant. This reduces compatibility issues.
Script Debugging
Debugging scripts is important for reliable microsoft 365 management. You need to understand where your script fails and what values it returns. Start by testing your automation scripts with regular powershell before moving them to Azure Automation. This makes debugging easier.
You can use several techniques to troubleshoot script errors:
- Log script outputs. Collect detailed information during script execution to identify issues.
- Handle errors with try/catch blocks. This lets you manage failures and take specific actions.
- Pay attention to error messages. Use the
-ErrorActionparameter to control how powershell responds to errors.
try {
    # Example powershell command for microsoft 365 tenant
}
catch {
    Write-Error "An error occurred: $_"
}
Note: Reviewing logs and error messages helps you find the root cause of script failures in your microsoft 365 tenant.
Support Resources
You have access to many resources for help with microsoft 365 powershell issues. Microsoft offers official documentation and community forums. You can also join user groups and online communities to get advice from other administrators.
| Resource Name | Link |
|---|---|
| Microsoft 365 community resources for PowerShell | Microsoft Docs |
| Microsoft 365 Microsoft Tech Community | Tech Community |
| Exchange Server TechNet community forum | TechNet Forum |
You can also explore these communities:
- User Groups
- PowerShell Tech Community
- DSC Community
- PowerShell.org
- Stack Overflow
- r/PowerShell subreddit
- PowerShell Virtual User Group on Slack and Discord
😊 You can solve most microsoft 365 powershell issues by following troubleshooting steps and using community support. Stay proactive and keep your tenant secure.
Expanding PowerShell Skills for Microsoft 365
Advanced Scripting
You can take your microsoft 365 management to the next level by learning advanced powershell scripting techniques. These skills help you automate complex tasks and handle large environments with ease. When you use advanced cmdlets, you gain more control over group membership and user details. Script optimization lets you process data faster and reduce errors. You can write custom functions to handle repetitive jobs, which makes your scripts easier to read and maintain.
The table below shows some advanced scripting techniques that work well for microsoft 365 administration:
| Technique | Description |
|---|---|
| Advanced Cmdlets | Use commands like Get-MsolGroupMember for detailed group membership management. |
| Script Optimization | Streamline scripts with pipelines to retrieve licensed users efficiently. |
| Custom Functions | Create functions for repetitive tasks to improve readability and reusability. |
| Module Creation | Organize scripts into modules for better management and sharing. |
| Advanced Automation | Use event-driven automation to trigger scripts based on specific events. |
| Integrating with APIs | Connect to APIs like Microsoft Graph for advanced management capabilities. |
You can also create your own powershell modules. This helps you organize scripts and share them with your team. When you integrate powershell with APIs, you unlock even more features in microsoft 365. Event-driven automation lets you run scripts when something important happens, such as a new user joining your organization.
Tip: Start by improving one script at a time. Add functions or use pipelines to make your code faster and easier to understand.
Learning Resources
You can find many resources to help you grow your powershell skills for microsoft 365. Microsoft Learn offers step-by-step guides and hands-on labs. The official Microsoft Docs site provides detailed examples and explanations for every powershell command. Community forums and user groups let you ask questions and share ideas with other administrators.
Here are some ways to keep learning:
- Join online communities like PowerShell.org or the Microsoft Tech Community.
- Watch tutorial videos on YouTube that cover real-world microsoft 365 scenarios.
- Read blogs and articles from experts who share tips and best practices.
- Practice by writing your own scripts and testing them in a safe environment.
You can also attend virtual user groups or webinars. These events give you a chance to learn from others and stay updated on new features in powershell and microsoft 365.
Remember, the best way to improve is to practice often and ask questions when you need help. As you build your skills, you will manage your microsoft 365 environment with more confidence and efficiency.
You can transform your microsoft 365 management with powershell. These tools help you automate tasks, control your tenant, and keep your microsoft 365 environment secure. When you follow the steps and scripts in this guide, you save time and reduce errors across your 365 services. Keep learning and apply best practices for ongoing success. Use the table below to guide your daily microsoft 365 administration:
| Best Practice | Description |
|---|---|
| Continuous Security | Make security a daily habit as your 365 environment grows. |
| Automation of Alerts | Set up alerts for important microsoft events to lower risk and effort. |
| Proactive Management | Automate routine powershell tasks and focus on improving your tenant. |
Stay proactive with powershell and microsoft 365 to support a secure, scalable 365 tenant.
Manage Microsoft 365 with PowerShell — Checklist
Use this checklist when managing Microsoft 365 with PowerShell to ensure consistency, security, and automation.
Preparation
Install and Update Modules
Authentication and Connections
User and License Management
Groups and Teams
Exchange Online
SharePoint and OneDrive
Security and Compliance
Automation and Scripting
Monitoring, Logging, and Auditing
Backup and Recovery
Best Practices
Post-change Validation
Keep this checklist as a template and tailor items to your organization's policies and compliance needs.
use powershell for microsoft 365: connect to microsoft 365 and manage user accounts
What is the recommended way to connect to Microsoft 365 using PowerShell?
The recommended approach is to use the modern Online PowerShell modules such as the Exchange Online PowerShell V2 module and the MSOnline or Azure AD PowerShell modules with modern authentication. Install the appropriate online powershell module, then connect using Connect-ExchangeOnline or Connect-MsolService/Connect-AzureAD (or Microsoft Graph PowerShell) and authenticate with your admin account or Microsoft Authenticator app for MFA.
Which PowerShell modules do I need to manage Microsoft 365 services such as Exchange Online and Azure AD?
Common modules include ExchangeOnlineManagement (Exchange Online PowerShell), AzureAD or AzureAD.Standard.Preview, MSOnline for older scripts, and Microsoft.Graph modules for unified management. Use powershell for microsoft 365 modules like ExchangeOnlineManagement and Microsoft.Graph to manage microsoft 365 services, user accounts, accounts and licenses, and compliance tasks.
Can I use PowerShell 7 or do I need Windows PowerShell 5.1 to manage Microsoft 365?
You can use PowerShell 7 for many Microsoft Graph and newer modules, but some legacy modules and the classic Exchange Online cmdlets historically required Windows PowerShell 5.1. Use a single PowerShell session with the recommended online powershell module versions; consult additional resources to determine if you need windows powershell 5.1 for specific management tool compatibility.
How do I run the following command to list Microsoft 365 users and their licenses?
Use the Microsoft Graph or Azure AD cmdlets, for example: Install-Module Microsoft.Graph; Connect-MgGraph -Scopes User.Read.All; Get-MgUser -Filter "accountEnabled eq true" and then expand license details. If using AzureAD: Connect-AzureAD; Get-AzureADUser | Select DisplayName, UserPrincipalName and then Get-AzureADUserLicenseDetail for accounts and licenses.
What are common admin tasks 365 administrators perform with PowerShell for Microsoft 365?
Admin tasks include creating and managing microsoft 365 users, assigning or removing licenses, bulk import of user accounts, managing Exchange mailboxes, configuring compliance policies, and automating repetitive tasks with powershell script files. Use automation commands to streamline onboarding and offboarding workflows.
How do I manage Microsoft Exchange mailboxes using the Exchange Online PowerShell module?
Install and import the ExchangeOnlineManagement module, connect using Connect-ExchangeOnline, then run Exchange Online PowerShell cmdlet commands like Get-Mailbox, Set-Mailbox, or New-Mailbox. Using the exchange online powershell cmdlets allows you to manage mailbox permissions, retention policies, and mailbox features in your office 365 tenant.
Is there a recommended strategy for running bulk changes or scripts safely in Microsoft 365?
Create and test powershell script files in a non-production environment, use -WhatIf and -Confirm switches where supported, log output, and run changes in small batches. Back up current settings (export to CSV), and learn about using automation commands and version control before applying broad changes to a microsoft 365 subscription or office 365 tenant.
How do I use PowerShell to manage licenses and user accounts in Microsoft 365?
Connect to Azure AD or Microsoft Graph, then use cmdlets like Set-MgUserLicense or Set-MsolUserLicense to assign or remove licenses. For bulk updates, import a CSV of users and iterate with a foreach loop to apply license changes, ensuring you map license skuIds correctly for microsoft 365 enterprise plans.
Can I use PowerShell to interact with Skype for Business Online or Teams settings?
Skype for Business Online management has been largely replaced by Microsoft Teams and its PowerShell modules. Use the Teams PowerShell module and Graph API for modern management; for legacy Skype for Business online tasks, older modules exist but migrating to Teams and modern Graph-based administration is recommended for ongoing support.
What should I do if I lose my admin session or need to close the PowerShell window during a task?
If you need to close the powershell window, save your work and scripts, and reconnect later using the same connect commands. For long-running tasks, run them in a persistent session or use scheduled automation (Azure Automation or runbooks). When closing the powershell window, ensure you properly disconnect sessions like Disconnect-ExchangeOnline to avoid orphaned sessions.
How do I use compliance PowerShell commands to manage retention and auditing in Microsoft 365?
Use the Security & Compliance Center PowerShell or Microsoft Graph Compliance APIs to manage retention policies, audit settings, and eDiscovery. Install the relevant modules, connect with appropriate permissions, and run compliance powershell cmdlet commands to create retention labels, configure audit retention, and export reports for compliance review.
Where can I find additional resources and technical support to learn how to manage Microsoft 365 with PowerShell?
Microsoft Docs, the PowerShell Gallery, GitHub sample scripts, and Microsoft Learn provide tutorials and examples. Look for guides on powershell for microsoft 365, online powershell module documentation, and community blogs. For technical support, use your microsoft 365 subscription support channels or engage with Microsoft technical support and community forums for 365 administrators.
🚀 Want to be part of m365.fm?
Then stop just listening… and start showing up.
👉 Connect with me on LinkedIn and let’s make something happen:
- 🎙️ Be a podcast guest and share your story
- 🎧 Host your own episode (yes, seriously)
- 💡 Pitch topics the community actually wants to hear
- 🌍 Build your personal brand in the Microsoft 365 space
This isn’t just a podcast — it’s a platform for people who take action.
🔥 Most people wait. The best ones don’t.
👉 Connect with me on LinkedIn and send me a message:
"I want in"
Let’s build something awesome 👊
How many hours have you lost just trying to get your local dev environment to behave? Spinning up APIs. Configuring databases. Syncing services. All of it happens before you even touch a line of business logic, and it starts to feel like setup is half your actual job. Aspire advertises something different — a single command designed to orchestrate your frontend, backend, and dependencies so they start together. It’s not pitched as another layer of complexity, but as a way to make your existing tools finally work in sync. In this podcast, I’ll show you the command itself, walk through the built-in dashboard that reveals what’s happening under the hood, and explain why it doesn’t require replatforming your stack. Because the real problem here isn’t just wasted time — it’s what setup is quietly taking away from actual development.
The Hidden Time Drain Nobody Talks About
Here’s the thing almost nobody admits: the real time drain in development isn’t coding itself. It’s the hours lost to setup and maintenance — the hidden work that so often derails momentum before you’ve even opened your editor. That’s the trap we need to put under a spotlight. Take onboarding a new hire. They join ready to contribute, open their laptop, and instead of pushing their first change, they’re stuck on outdated docs that reference Docker scripts written years ago. The commands fail on their OS, the config no longer matches the reality of the stack, and soon they’re escalating to teammates just to chase environment variables. What should be a productive first day turns into a scavenger hunt that slows everyone down. Now zoom out to someone who’s been with the codebase for years. They make a routine update, expecting to get into feature work, but instead a single service crash spirals into hours of reconfiguring logging formats, hunting through YAML files, and rebuilding containers. By the time things are stable again, half the day is gone. Nothing new has shipped, and all that energy went into keeping the system upright. Scenarios like these aren’t edge cases—they’re daily reality. A significant chunk of a developer’s time gets eaten by startup fragility and dependency sprawl. And while each step seems small—fix a config here, restart a container there—the cumulative effect across the team is huge. It becomes a cycle of maintenance work that looks invisible on a roadmap, yet it steadily drags delivery down. This drain is more than inefficiency; it also makes the whole process fragile. Running a dev stack often feels like assembling flat-pack furniture with instructions that no longer match the pieces. You tighten one screw, another pops loose. Even when everything holds together, it wobbles. That environment works in theory, but it’s always one step away from collapsing under its own complexity. The harder truth is that these loops sneak up on everyone. Developers crave momentum—the shortcut from idea to running code. But instead of speed, we keep colliding with environment issues that sap focus. It’s a structural obstacle, not a personal failing, and it doesn’t matter whether you’re onboarding, patching, or building something new. The friction is baked into the process. This is where the question becomes unavoidable: why are we still accepting all this overhead as normal? If modern frameworks, languages, and infrastructure promise acceleration, why does the local developer loop still feel so heavy? What would it look like if the setup cycle wasn’t yet another problem to manage but something that simply worked in the background—with no scavenger hunt involved? Because here’s the tantalizing possibility: there might be a way to collapse the entire cycle. Imagine skipping the endless scripts, ignored YAML warnings, and fragile workarounds—replacing all of it with a single command that not only runs the whole stack but also makes it observable from the start. Now imagine that whole scavenger hunt could start and finish with one command — and with built-in observability. That’s what we’ll unpack next.
A Single Command That Changes the Game
What actually changes here is that Aspire introduces a single command designed to simplify the entire startup process. The idea is straightforward: instead of wrangling layers of YAML, fragile Compose scripts, and dependency order problems, you open your terminal and type one instruction — “aspire run.” We’ll walk through what that looks like in a moment so you can see how services come online together without the constant manual adjustment developers are used to. Normally, getting a local stack running means writing YAML for each service, wiring environment variables, checking health probes, and hoping containers start in the right sequence. Even with Docker Compose, those files quickly bloat into hundreds of lines for networking, volumes, and service coordination. Once it’s all running, the real work begins — chasing through log windows and repeat-edit-restart loops every time something breaks. It’s a workflow we accept as normal, but it eats both momentum and focus. Aspire’s approach is to reduce that burden. When you run its startup command, the stack comes online as a coordinated whole. Your frontend service knows where the backend lives without extra patches. The database is ready before connections are attempted. Background workers idle until messages start flowing. Whether you watch it in real time or just trust the system to arrange things correctly, the point is that orchestration no longer feels brittle. It’s designed to help existing projects start cleanly rather than asking you to rebuild your stack around a new model. The part that stands out is how flexibly it handles mixed environments. Yes, .NET scenarios are fully supported, but if your stack mixes a Node.js frontend, a Python task runner, and custom Docker containers, Aspire still treats them as part of the same workflow. Languages and services aren’t segregated into separate silos. You can keep your heterogeneous setup but boot everything together with a single command. If you’re wondering whether it works with your existing Dockerfiles, the answer is that Aspire is intended to work with what you already have — but you’ll want to verify details in your own project to be sure. To keep this concrete: picture launching the terminal and running “aspire run.” The services boot in a sequence that makes sense. The frontend immediately routes traffic to the backend API. The API starts handling requests against a live SQL container. Message queues come online, and background processors begin consuming them. There’s no new format to learn, no forks of your codebase, and no special wiring files replacing your existing setup. It’s still your environment — but the starting friction is stripped away. Of course, any developer will ask whether there’s a catch. Tools that promise to eliminate boilerplate often end by locking you into a custom configuration language or enforcing a rigid project structure. Here, that doesn’t appear to be the case. You keep your Dockerfiles and existing services. Aspire’s aim is to orchestrate them, not replace them. That said, check current documentation to confirm the boundaries — especially if your project includes custom networking or non-standard container builds. This design shift carries a bigger effect than just time savings. When startup becomes dependable, you stop thinking about YAML tweaks or container restarts before coding. The effort you save isn’t only minutes at boot — it’s attention that would otherwise be drained into system upkeep. The environment is ready, so you return to your actual work instead of firefighting infrastructure every morning. And here’s the real turning point. Aspire doesn’t just launch services; it changes what the startup process delivers. Because once your stack is running, the next issue isn’t bringing it up — it’s figuring out what’s happening inside it. That’s where hidden complexity shows itself most: when you’re debugging across multiple moving parts. And it’s exactly why the next feature matters.
Debugging Without Guesswork
Debugging is where developers feel the grind most sharply, because diagnosing problems across a distributed stack rarely happens in one place. A background worker fails, the API logs look fine, and the database appears healthy—until you realize they’re out of sync. That pattern of jumping between terminals, log folders, and separate dashboards isn’t unusual; it’s the everyday loop that turns a small issue into a morning lost. The core challenge isn’t just bugs themselves but the fragmented context around them. In a simple monolith, the error is often in one log. With multiple services running side by side, even minor issues can sprawl. An API may show as “running,” but in reality, it can’t reach the database. Another service might look stuck when it’s actually waiting on a queue that never started. Without one view that ties all this together, you’re chasing fragments—and relying on educated guesswork more than actual debugging. Here’s where Aspire aims to change the process. Alongside the startup command, it provides a built-in way to surface key signals in one place. According to the docs, that includes logs, service health states, and traces captured through OpenTelemetry. If those integrations work as described, it means you no longer have to piece the picture together manually. Instead of checking three different tools, you open the Aspire dashboard, check which services are healthy, and, if there’s a failing service, follow its trace to see why. Please verify with the product documentation how these features behave in current builds, especially the handling of OpenTelemetry. Presented as a flow, it works like this. First, you launch your stack with `aspire run`. Second, you open the Aspire dashboard. Third, you scan the health indicators—if the API can’t talk to the database, you’ll spot it immediately. And finally, you follow the linked trace to confirm where the failure originated. Rather than deciding which terminal window to check first, you already have the bigger picture available. Confirm these steps are accurate for the product before recording, but this is the intended workflow the docs suggest. To make this practical, consider a scenario that many teams run into: the API container boots and reports “healthy,” but every request it handles fails. The real issue isn’t the API—it’s that the database connection is broken. Normally you’d bounce between API logs, database CLI tools, and maybe a monitoring tab somewhere else. With Aspire’s dashboard, both the API’s health state and the trace showing failed DB connection attempts appear in the same view. That immediately answers the question of “where to start” without the detours. This unified context matters because it strips away the invisible cost of debugging. Most of us have spent as much time choosing the next tool to open as we have fixing the root cause. When the choice is gone—because logs, health checks, and traces share one window—we recover that lost focus. Debugging doesn’t necessarily become effortless, but it becomes linear. You know where to look, in what order, and why. One detail worth noting is how Aspire handles observability frameworks. For teams that haven’t wired tracing across every service, Aspire’s design can auto-enable OpenTelemetry out of the box. For teams that already use it, the data feeds directly into the same dashboard. This means distributed tracing isn’t a separate initiative or another backlog item; it’s part of the runtime environment. Again, verify these claims against current documentation—if Aspire only exposes partial tracing data, adjust how this is presented on-screen. The payoff is less about fancy visualization and more about clarity. Unified context means faster fixes and fewer blind guesses. You’re working from the whole picture instead of dozens of scraps, which keeps debugging closer to diagnosis and further from scavenger hunt. Less time in setup, less time in debugging overhead—more time aimed at actual solutions. And while that shift is meaningful on its own, it raises an even bigger question. If debugging is easier when everything is collected in one place, what happens when the same principle is applied to microservices themselves? Most tools still put conditions on how you run them—they expect a rewrite or a migration before you see the benefits. That’s often where teams hesitate, and it’s where Aspire takes a very different path.
Microservices Without the Rewrite
Most tools that promise to simplify microservices start with a catch. They look appealing, but only if you agree to reshape the way your system is built. That often means discarding parts of your environment, rewriting services so they fit into a new framework, and restructuring years of work. On paper, this sounds like modernization. In practice, it’s expensive, risky, and often impossible to justify for teams already running production workloads. The safer option becomes doing nothing and accepting the drag of brittle local environments. The reality is that development teams don’t operate in pristine, greenfield conditions. They already maintain APIs that keep customers connected, databases carrying real business data, and background services that employees depend on daily. Asking teams to pause feature delivery to replatform that stack is rarely an option. Tools succeed when they plug into existing workflows, not when they demand a reset. This is where Aspire positions itself differently. Instead of enforcing a rewrite or lock-in around one ecosystem, it’s designed to work with what you already have in place. Please confirm this against the official documentation, but the intent is clear: minimize migration work rather than mandate it. If your project includes legacy components that still matter alongside modern services, Aspire is meant to start them together as part of the same environment. That means the conversation shifts from “what must we discard?” to “how do we run everything more reliably?” Think about a typical environment. You might have an older .NET application still handling a critical workflow. On top of that, a modern frontend—perhaps in React—drives customer-facing features. Add in a containerized worker service built years later in Python, and suddenly you’re juggling three different eras of engineering all under one umbrella. Normally, bringing these pieces together requires scripts, manual sequencing, and constant patching. With Aspire, those components are treated as part of the same orchestration target. The result isn’t new code—it’s familiar services that now start in sync. That inclusivity is where the tool becomes useful. Enterprises rarely operate on a single stack; they combine multiple languages, frameworks, and container strategies. By focusing on orchestration rather than replacement, Aspire aims to bring these varied components into alignment. Verify the specifics against documentation, but the positioning is that age or tech choice doesn’t disqualify a service from being included. The house analogy holds: you don’t rebuild every room to modernize the circuit breaker. The layout stays, the furniture stays, but suddenly everything works from the same wiring. With Aspire, legacy APIs and new microservices don’t demand a costly rebuild. They stay as they are, but they share a consistent startup and operational flow. From the engineering perspective, this replaces brittle rituals with predictable environments. From the business perspective, it sidesteps the kind of migration project that halts progress for months. What this means over time is practical, not abstract. Developers stop losing cycles reconfiguring YAML or patching scripts just to launch their stack. New contributors onboard faster because the environment they run looks consistent with everyone else’s. Ongoing work becomes less about maintenance overhead and more about releasing useful features. The cumulative gain isn’t measured in dramatic shifts—it’s in reducing the drag that teams have internalized as normal. To make this point more concrete: picture onboarding a teammate. Instead of handing them a fragmented set of config files or an outdated setup guide, they run one command, and services boot in a sequence that works. They don’t need to understand every legacy pattern on day one. They don’t need to chase dependencies across three different runtimes before they commit their first change. They start coding. That’s the real measure of whether a tool earns adoption—it makes both old and new systems feel like part of the same environment. One note here: confirm whether Aspire requires additional configuration files or modifies existing Dockerfiles to work. If it truly “just orchestrates,” that’s a strength worth stating directly; if some new declarations are needed, that’s a detail your team should be aware of when evaluating adoption. Either way, the value lies in reducing the amount of rewriting, not increasing it. Ultimately, the promise isn’t that Aspire erases complexity—it’s that it removes the repeated overhead of bending your stack into shape. You keep the mix of old and new, and you gain a cleaner way to run it. Once that burden begins to drop, a new possibility opens—redirecting time and energy toward the work that actually brings value. And that shift brings us to the next question: what happens when teams spend less effort configuring and more effort building?
The Real Payoff: Building, Not Configuring
At its core, development has always been about building things that didn’t exist before—features, workflows, and experiences that create value. Yet much of a developer’s daily energy gets channeled into tasks that don’t advance that goal. Writing Dockerfiles, wiring YAML, massaging order of operations—none of that is why people join engineering teams. Businesses fund engineering to deliver outcomes, but hours leak away into plumbing work that produces no visible progress. That’s the gap tools like Aspire are trying to close. This gap is especially pronounced in modern development cycles. Companies invest heavily in cloud capacity, monitoring subscriptions, and senior talent, but the real drag still lurks close to the keyboard. You can provision infinite scale in the cloud, but if starting your local stack feels like warming up an old diesel engine, the whole workflow suffers. The bottleneck isn’t infrastructure; it’s the time it takes to get rolling locally. That delay breaks momentum in ways no amount of cloud elasticity can fix. Aspire’s contribution is to pull that overhead out of the loop. The act of booting services stops feeling like a half-day ceremony and starts feeling like a single step. Instead of scripts compiling, logs streaming, and containers failing one by one, services come online together. For developers, that collapse of setup overhead fundamentally changes the pace. What used to feel like walking through a checklist now feels like snapping into focus. The rhythm of iteration tightens naturally: make a change, run the stack, test, and move forward. Onboarding shows the benefit most clearly. In many teams, a new hire begins by slogging through docs that don’t match reality, patching environment variables, and confirming whether their OS aligns with half a dozen manual instructions. That’s not coding—it’s unpaid archaeology. Replace that with an environment that boots on a single command, and the difference is obvious. The new hire’s first contribution becomes a feature branch instead of yet another note about outdated setup steps. That kind of first-week momentum pays off for everyone, not just the person onboarding. Iteration cycles also shift. It’s not only about speed to start the stack but the kind of feedback you get once it’s running. Aspire’s integrated observability means logs, service health, and traces appear in one coherent view. You no longer wonder which terminal to check first when an API call fails. Instead, the feedback is connected as part of each run. That compression of context shortens the debug loop, meaning developers can adjust behaviors mid-cycle instead of stopping to assemble clues. Even small adjustments, like shaving repeated context switches, change the feel of day-to-day work. This matters because coding is inherently creative work. Developers thrive when they can focus on problems worth solving. Configuration, in contrast, is maintenance. It doesn’t build new value; it just supports the stage where value might eventually appear. The ratio between those modes is what defines team energy. Teams stuck in configuration-heavy loops feel drained, while those operating in flow feel productive. By redistributing the balance back toward building, Aspire restores some of that creative momentum. And even if the time saved on setup feels small in the moment, what compounds is the consistency. When every developer saves fractions of an hour on repetitive loops across a sprint, the effect cascades. For example: a small daily saving translates into more uninterrupted work sessions, more opportunities to push features forward, and fewer moments lost to logistic delays. Over the life of a project, that compounding matters far more than one dramatic win. It’s the steady pattern of reclaimed focus that shifts delivery. The morale component can’t be overlooked either. Developers enjoy closing tickets, landing features, or solving problems. They don’t enjoy scrolling through config files or searching log folders just to get unstuck. When the balance tilts away from overhead, day-to-day work feels more rewarding. Individuals feel their time is respected, and teams build an environment where creating impact is the norm rather than the exception. That shift influences retention, satisfaction, and the culture of engineering as much as it influences output. Put simply: remove setup overhead and teams spend more of their day shipping value. When progress consistently beats friction, the engineering loop feels lighter, and momentum becomes easier to sustain. And this naturally raises the final point—local development doesn’t have to be the part of the job that slows everything else down.
Conclusion
Aspire aims to strip away the slowest, least rewarding part of development and replace it with a single-command approach to starting multi-service stacks. Instead of juggling containers, configs, and startup order, you get more time back for building features that matter. If setup no longer drained your focus, what would your team actually ship faster? To try it yourself, check the official Aspire docs linked in the description and run the quickstart. Then drop a comment: what was your worst local dev setup story—or the single command you wish existed? If setup stops stealing your time, you get to build more. Try it and see.
This is a public episode. If you'd like to discuss this with other subscribers or get access to bonus episodes, visit m365.show/subscribe

Founder of m365.fm, m365.show and m365con.net
Mirko Peters is a Microsoft 365 expert, content creator, and founder of m365.fm, a platform dedicated to sharing practical insights on modern workplace technologies. His work focuses on Microsoft 365 governance, security, collaboration, and real-world implementation strategies.
Through his podcast and written content, Mirko provides hands-on guidance for IT professionals, architects, and business leaders navigating the complexities of Microsoft 365. He is known for translating complex topics into clear, actionable advice, often highlighting common mistakes and overlooked risks in real-world environments.
With a strong emphasis on community contribution and knowledge sharing, Mirko is actively building a platform that connects experts, shares experiences, and helps organizations get the most out of their Microsoft 365 investments.