How to Manage and Create Channels in Microsoft Teams

Getting your channels right in Microsoft Teams can make or break your team's collaboration game. This guide is here to walk you through how to create, manage, and optimize channels so you can keep communication organized, secure, and efficient. We’ll cover everything from picking the right channel type to setting up governance, naming, and automation tools that help professional teams scale with confidence.
Whether you’re just starting with Teams or you’ve got channel sprawl starting to look like your grandma’s attic, these actionable strategies will help you shape a workspace that’s easy to use and tough to outgrow. Expect hands-on tips, insights to keep your data safe, and solutions for common headaches as you manage your channels in any business environment.
5 Surprising Facts About Microsoft Teams Channels
- Private channels create a separate SharePoint site and storage, so files inside a private channel are stored separately from the parent team's files.
- Shared channels let you collaborate with people from other organizations without adding them as guests to the entire team, simplifying cross-organizational access control.
- Every channel can have its own email address, allowing you to send emails directly into a channel conversation (if your admin enables it).
- Deleted channels can be restored by a team owner within 21 days, preserving conversations, files, and tabs in most cases.
- Channel moderation can restrict who can start new posts and control @mentions, enabling quieter or announcement-only channels without creating a separate team.
Understanding Channel Types in Microsoft Teams
Before you dive into creating channels, it’s important to understand the different options Microsoft Teams has to offer. Each type—standard, private, or shared—comes with its own strengths, limitations, and ideal uses within a team. The choices you make here affect everything from who sees your messages to how files are stored and who gets looped into the conversation.
You’ll want to pay attention to the security and access implications of each channel type. For example, confidential HR discussions probably shouldn’t be sitting in a general channel where the whole marketing department can see them. On the flip side, project teams sometimes need to work with folks outside the main organization, which opens up a whole other can of worms when it comes to permissions and governance.
Understanding the core differences sets you up to make informed decisions that protect sensitive info, improve productivity, and keep everyone on the same page. In the next sections, we’ll dig into when to use private versus shared channels and break down the real-world scenarios where each type shines. If you want a deeper comparison guide, check out this Teams channel comparison and get practical advice for organizing your collaboration spaces the right way.
Choosing Between Private and Shared Channel Options
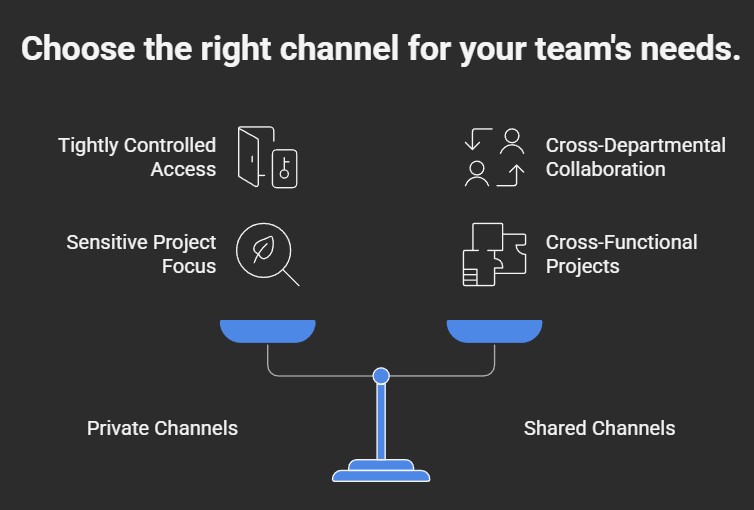
- Private Channels: Best for confidential discussions where access needs to be tightly controlled. Ideal for HR, leadership, or sensitive projects inside a team. Only invited members can view or join, so you avoid accidental leaks.
- Shared Channels: Perfect for working across different departments or even with external partners. Lets you bring in folks from outside the team without giving them full access to everything else. They’re a lifesaver for cross-functional projects—just keep in mind some integrations may have limits.
- Governance Tip: For more on features, pros, and cons, take a look at this detailed decision guide for private vs shared channels.
Comparing Different Channel Types and Use Cases
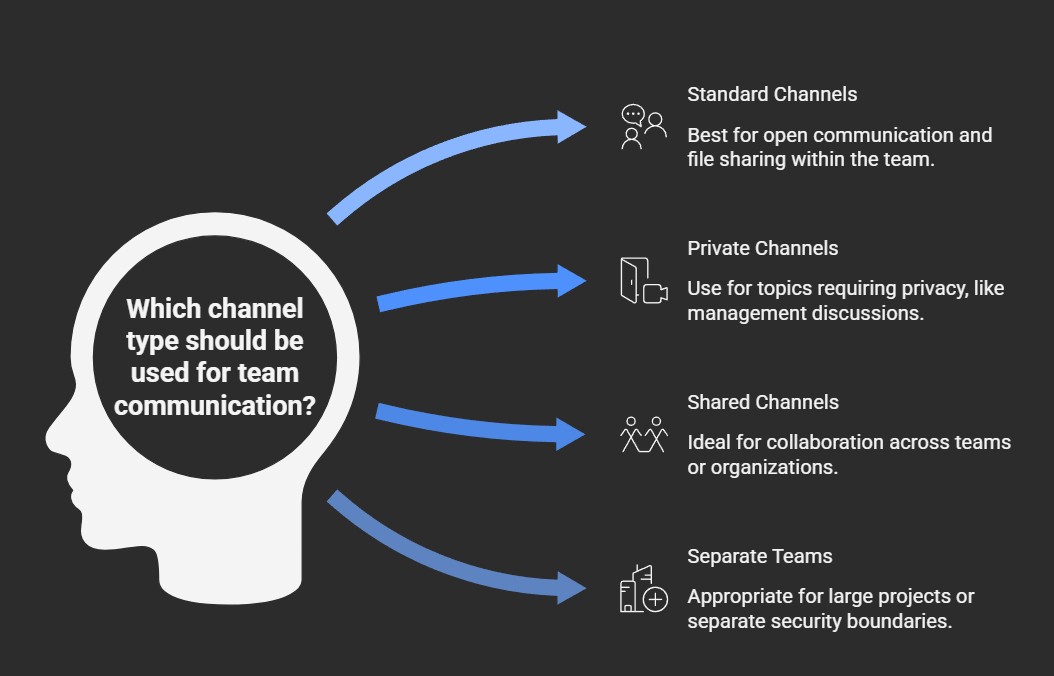
- Standard Channels: Best for open communication where the whole team needs access. Useful for general discussions, announcements, and file sharing within the group.
- Private Channels: Limited to selected members within the team. Use for topics where privacy is mandatory—like management conversations or financial reviews.
- Shared Channels: Designed for seamless collaboration across teams or organizations. Great for joint projects, support desks, or when you need collaboration partners who aren’t team members.
- Separate Teams: Sometimes, a whole new Team is more appropriate—especially for big projects or when you need a totally separate security boundary. For further insights, check this guide on Teams architecture.
Step-by-Step Guide to Creating Channels in Microsoft Teams
Now that you know what channel types are available, let’s talk about how to bring them to life in Teams. Creating channels is the backbone of collaboration—whether you’re setting one up for a new project, department, or to kick off a social club. The key is choosing the right structure from the start, so your team isn’t left navigating a messy, unsearchable pile later.
Microsoft Teams gives you the option to create channels manually or use templates to streamline the process. Templates take a lot of the guesswork out of channel setup, especially when you’re dealing with larger teams or repetitive use cases. And if your team thrives on community and connection, setting up dedicated community or social channels makes it easy for people to engage and share beyond just work.
The next few sections will walk you through how to create a channel, set one up using templates for efficiency, and offer practical steps for launching spaces that support open dialogue and community. Either way you go, you’ll be building a workspace that’s neat, organized, and easier for everyone to use.
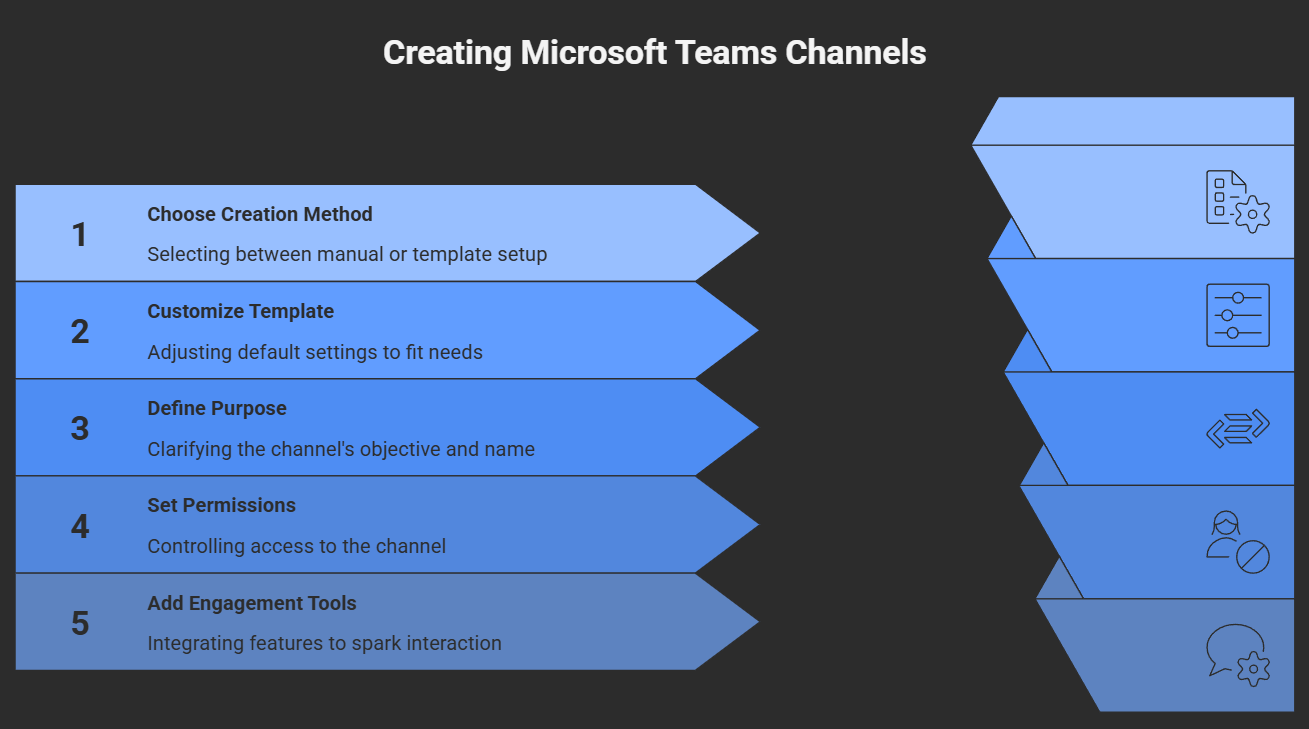
Creating Channels from Template for Efficiency
- Start from Template: Microsoft Teams offers pre-built templates for channels, which save time and promote consistency across multiple teams or projects.
- Customize as Needed: These templates often include default tabs, apps, and settings, but you can tweak them for your workflow—rename channels, add integrations, and adjust permissions to fit your needs.
- Governance Support: Templates are a lifesaver when you want to enforce company-wide standards or streamline onboarding for new teams, reducing setup errors and making sure every team is set up the same way.
How to Create Community and Social Channels
- Define the Purpose: Decide if the channel is for general socializing, knowledge sharing, or specific communities of interest. Give it a clear, friendly name and description to encourage participation.
- Set Appropriate Permissions: Keep the channel open to as many people as possible for community spaces, but for sensitive groups, limit access using Teams’ permissions settings.
- Add Engagement Tools: Integrate polls, chatbots, or schedule regular events to spark conversation and keep the community active.
- Monitor for Health: Assign moderators or rotate responsibility to maintain a positive environment and ensure the space aligns with company policies and cultural values.
Best Practices to Manage Channels Effectively
Once you’ve set up your channels, keeping them organized takes a bit of ongoing effort. Over time, teams can end up with too many channels, outdated topics, or duplicate spaces. Without attention, that clutter slows everyone down and increases the chance of info slipping through the cracks.
Managing your Teams environment means editing or reorganizing channels when business needs change, and knowing when it’s time to hide or archive channels that aren’t active anymore. A well-maintained workspace helps people quickly find what they need and keeps sensitive information secure.
For organizations looking to scale or operate in regulated environments, building strong governance into your Teams strategy adds discipline and prevents channel chaos before it starts. If you want ideas for transforming chaos into confident collaboration, check this Teams governance overview. And to avoid sprawl, see how automating channel lifecycle and reporting can keep things tidy without babysitting every workspace.
How to Edit or Update a Channel After Creation
- Edit the Channel Name or Description: Go to the channel, select the three dots (More options), and choose Edit. Update the name or description to reflect new focus or clarify usage.
- Modify Membership: For private channels, add or remove members directly via the settings. Make sure only the right people have access as team roles change.
- Adjust Settings and Apps: Channels can have tabs, bots, or apps added or removed as needs evolve. Update permissions and integrations so everything remains relevant and secure.
When to Hide or Archive a Channel
- Hide Inactive Channels: If a channel isn’t needed right now but might be useful later, use the Hide option so it doesn’t clutter the channel list for most users. It’s easy to unhide if things pick back up.
- Archive Channels No Longer in Use: When a project ends, archive the whole Team or specific channels to lock changes but preserve conversations and files for compliance or future reference.
- Follow Governance Policies: Use archiving and hiding as part of a regular channel review cycle to keep your workspace manageable and to make sure only current, relevant channels are visible—helping everyone stay focused, compliant, and secure.
Advanced Automation with Teams Manager for Channel Governance
Managing channels by hand in Microsoft Teams can feel like juggling during rush hour—especially if your company has dozens or even hundreds of active teams. That’s where automation tools like Teams Manager come in to save the day. Teams Manager brings order to the chaos, giving you templates, workflows, and controls to automate the whole channel creation and management process.
With Teams Manager, you can set up rules for how new channels get created, complete with approval workflows so only the right people can add or change things. This isn’t just about making your life easier; it’s about protecting data, keeping structure clean, and enforcing those always-tricky governance policies. Role-based permission settings help you lock down who can create, edit, or archive channels, so everything stays secure and compliant.
What really stands out is lifecycle automation. You can trigger archiving or review tasks automatically after certain periods of inactivity, or when project milestones are hit. This is a huge help for fighting Teams sprawl and keeping your environment tidy—no more overloaded channel lists and forgotten files. You can even automate onboarding channels for new projects, departments, or common requests, keeping things consistent and organized from the start.
Teams Manager also plugs in with the wider Microsoft 365 suite and reporting tools. If you want to get serious about tackling channel sprawl and automated governance, check out this guide on using lifecycle automation for proactive Teams management. The right tools take the heavy lifting off your plate and make your organization’s Teams experience smoother, safer, and a whole lot less stressful.
FAQ for How to Manage and Create Channels in Microsoft Teams
teams channel management: create a channel and manage team channels
How do I create a channel in Microsoft Teams and what types of channels can I choose?
To create a channel, go to the team, select More options (...) next to the team name, and choose Add channel. You can create a standard channel (visible and accessible to everyone on the team), a private channel (only specific members can access it), or a shared channel (to collaborate with people outside your team or other tenants). Choose the channel type based on whether the channel is for a specific project, confidential conversations, or cross-team collaboration.
Who can create channels and how do I add members or set channel owners?
By default, team owners and users granted permission by admins can create channels. Team owners can add members and assign channel owners through the channel’s settings, and you can invite people by selecting Add members or Add people in the team menu. For private channels, owners must explicitly add members; for shared channels, workspace or tenant policies set by admins and teams admin controls determine who can add outside collaborators.
How do I manage channel settings and notifications for better collaboration?
Open the channel, select More options (...) then Manage channel or Channel notifications to adjust settings. You can change notification frequency, channel moderation, and member permissions. Use channel settings and moderation to control who can post, pin important information, and integrate apps like OneNote. Admins and team owners can enforce policies at the tenant level, while members adjust their personal notification preferences.
What’s the difference between a standard channel, a private channel, and a shared channel?
Standard channels are for content visible to all team members. Private channels are restricted to a subset of team members and are suitable when confidential discussions are needed; only the channel owner and added members can access content. Shared channels allow collaboration with users outside your team or tenant without adding them to the entire team. Each type affects permissions, visibility, and how content is stored (private channels use a separate SharePoint site collection).
How do I delete a channel and what happens when I delete it?
To delete a channel, a team owner selects More options (...) next to the channel and chooses Delete this channel. Deleting removes conversations, files (stored in SharePoint), and tabs tied to the channel; however, owners can restore a deleted channel within 30 days from the team’s settings or via Microsoft support tools. Admins or teams admin may also recover data using compliance tools if required.
Can I automate channel creation and apply templates across different teams?
Yes. Admins and team owners can use templates, PowerShell scripts, and Graph API to automate channel creation and apply consistent channel settings across different teams. Microsoft Teams templates and automated provisioning help create teams and channels with preconfigured tabs, channels, and settings, which helps maintain governance and speed up onboarding for new projects or a new team.
How do I manage permissions and security for private channels and shared channels?
Private channels require explicit membership managed by channel owners; their content is stored in a separate SharePoint site collection with its own security boundaries. Shared channels rely on cross-tenant settings and tenant policies; admins configure whether people outside your team or tenant can access shared channels. Use tenant-level controls, channel’s settings, and periodic security updates to ensure only the intended people inside or outside your team can access sensitive information.
What should I do if I need help with advanced channel management or encounter issues?
If you need technical support, contact your IT admins or teams admin for tenant-wide policies, or open a support request with Microsoft support. Admins can use PowerShell, the Teams admin center, or Graph API to troubleshoot, upgrade settings, recover deleted channels, and apply security controls. For everyday help, team owners can manage team site links to SharePoint, check channel settings, and follow related topics in Microsoft documentation to help you make any changes safely.

Founder of M365 Show, M365con.net & m365.fm
Mirko Peters is a Microsoft 365 expert, content creator, and founder of m365.fm, a platform dedicated to sharing practical insights on modern workplace technologies. His work focuses on Microsoft 365 governance, security, collaboration, and real-world implementation strategies.
Through his podcast and written content, Mirko provides hands-on guidance for IT professionals, architects, and business leaders navigating the complexities of Microsoft 365. He is known for translating complex topics into clear, actionable advice, often highlighting common mistakes and overlooked risks in real-world environments.
With a strong emphasis on community contribution and knowledge sharing, Mirko is actively building a platform that connects experts, shares experiences, and helps organizations get the most out of their Microsoft 365 investments.

AI Governance Framework: Board's Guide to Responsible AI