Department Sites Setup: The Complete SharePoint Guide for Modern Teams
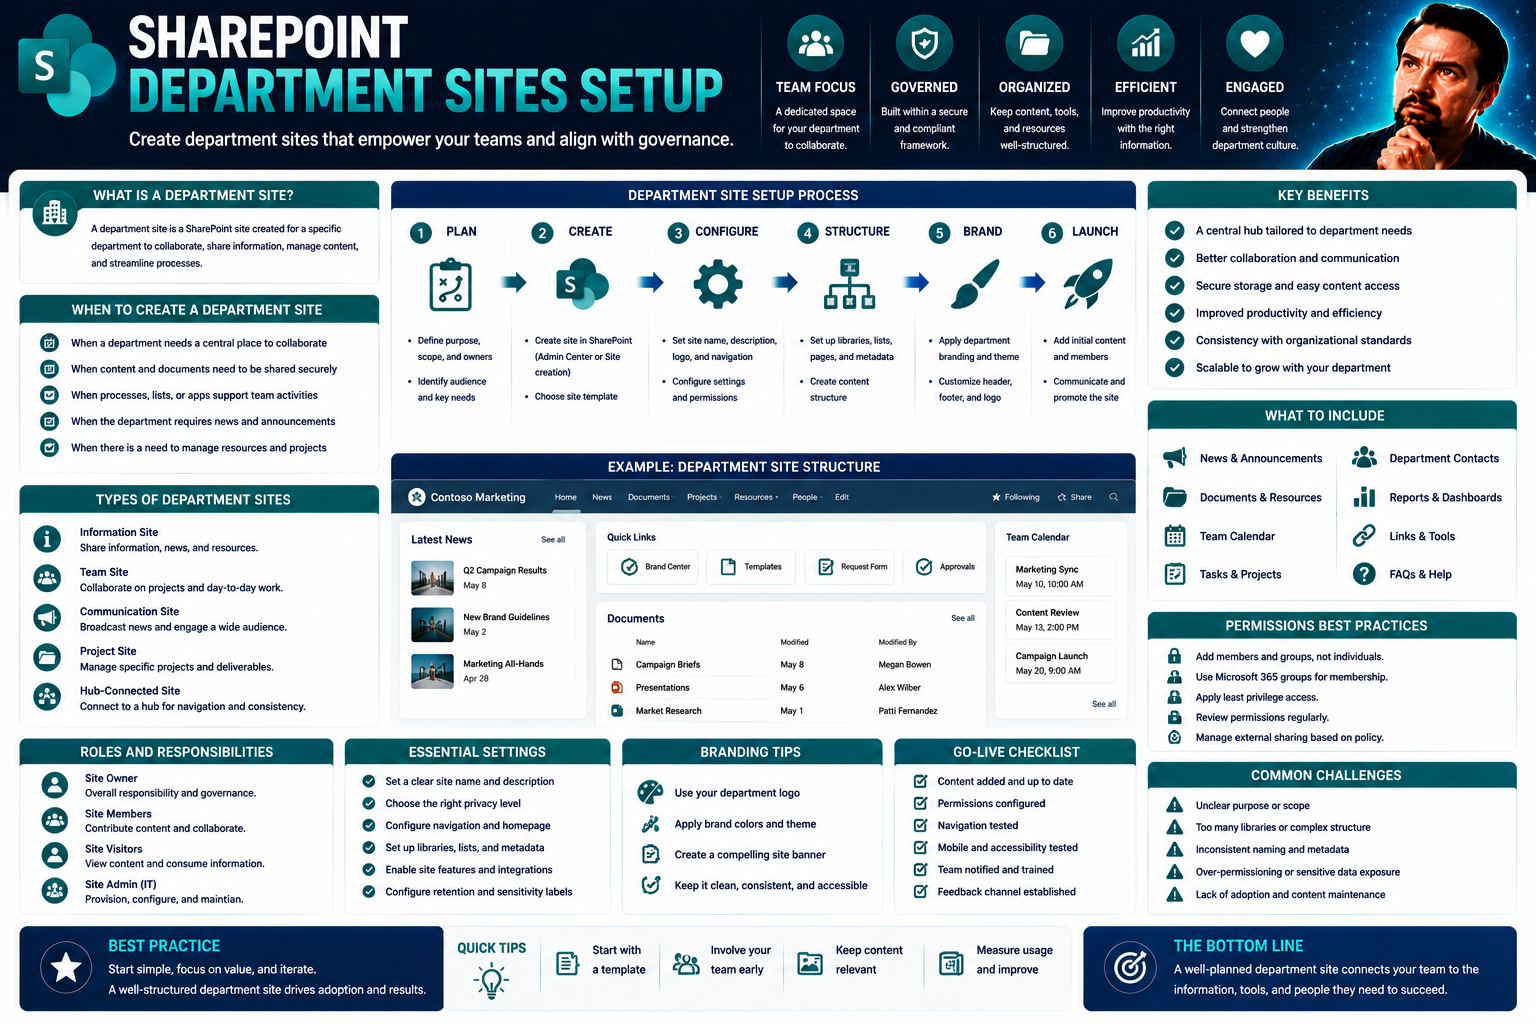
Structured department sites in SharePoint are the backbone of a modern digital workplace. When you get the setup right, you’re not just tossing files into the cloud—you’re building an organized, secure collaboration space where your teams actually want to work together. It’s not about dumping everything into one shared folder and hoping for the best; it’s about making sure everyone knows where to find what they need, fast.
This guide walks you through the whole process, step by step. We’ll start with the basics of getting your department and sub-department sites up and running in Microsoft 365, then move into advanced best practices for long-term success. Along the way, you’ll learn how good site setup can tighten governance, streamline document sharing, and improve cross-functional teamwork—whether you’re an IT admin, a digital workplace manager, or a business leader with a lot on your plate. The aim? To give you practical, clear answers that make your life easier and your workplace more efficient.
Step-by-Step Guide to Setting Up Department and Sub-Department Sites in SharePoint
Setting up department sites in SharePoint isn’t just about clicking a few buttons and calling it a day. It’s about establishing an organized, future-proof foundation for collaboration across your teams. With organizations moving to Microsoft 365 and hybrid work becoming the norm, having a solid SharePoint structure starts you off on the right foot.
This guide lays out a structured process: first, you’ll navigate the SharePoint Admin Centre to ensure you have the correct permissions and access. Next comes creating tailored department sites that house your team’s documents, news, and key apps. Finally, you’ll organize sub-department sites so each branch of your organization has their own digital home—without getting lost in a maze of folders and links.
Throughout the process, you’ll also learn how to set things up with governance and scalability in mind, not just what works today but what will still make sense tomorrow. Whether you’re just starting out with SharePoint or managing a complex, multi-department environment, this step-by-step approach will help you avoid common headaches and set standards everyone can follow. Get ready for actionable tips that make a real difference, and prepare to roll out department sites your teams will actually use.
Accessing the SharePoint Admin Centre for Site Setup
To kick off department site setup, you’ll need to access the SharePoint Admin Centre—your control console for all things SharePoint in Microsoft 365. You must have SharePoint administrator or higher permissions assigned within your organization. If you’re not sure, check with your IT lead or global admin before proceeding.
Navigate to the Microsoft 365 admin portal at https://admin.microsoft.com, then look for “Admin centres” and select “SharePoint.” This opens up the SharePoint Admin Centre dashboard. Here, you’ll find options for site creation, site management, and global settings that affect every department and team site.
Before starting any site creation, review available templates and ensure your environment reflects your organization’s policies for naming, permissions, and governance. Laying this groundwork now will save you from cleanup headaches down the road, streamlining the process for all future department and sub-department site deployments.
Creating Department Sites to Support Collaboration
- Pick the Right TemplateStart by choosing between a Team site (great for collaboration, document sharing, and Office 365 integration) or a Communication site (best for broad announcements and resources). For most departments, a Team site is the go-to choice, but don’t be afraid to mix it up if your use case calls for it.
- Establish Department Naming ConventionsKeep naming simple and descriptive. For example, use “HR Team” or “Finance Operations.” Following a standardized pattern helps users find the right site fast, especially as your organization—and your site count—grows.
- Assign Site Owners and Set ResponsibilitiesEvery department site needs a clearly identified owner (or two) who manages access and keeps everything up to date. The site owner isn’t just an IT checkbox—they’re your site’s internal champion, on the hook for organizing content and handling permission requests.
- Configure Permissions on Day OneSet up your core access groups: Owners (admins), Members (contributors), and Visitors (read-only). Use Microsoft 365 Groups to connect your site’s membership with Teams and Outlook, making collaboration smoother across the board.
- Add Essential Collaboration ToolsOut of the box, your site comes with document libraries, OneNote, shared calendars, and conversation feeds. Make use of these—don’t leave your team floundering in email chains and lost file versions. You can also pull in tools like Lists, Planner, or Power Automate for workflow automation as your needs get more advanced.
- Plan for Growth and Site NavigationDesign your department home page with a clear, simple navigation. Drop in quick links to sub-department sites, policy docs, or shared resources. This ensures nobody’s stuck hunting for files or announcements in the digital wilderness.
A solid department site is more than a document bucket—it’s a living workspace that can handle everything your team throws at it. Invest a few extra minutes at setup to make it friendly, organized, and ready for growth down the road.
Organizing Sub-Department Sites in SharePoint
- Create Subsites or Dedicated Sites for Each Sub-DepartmentIf your department breaks down into smaller teams (like HR with Recruiting, Benefits, and Training), set up dedicated sub-department sites. In SharePoint Online, it’s best to create new sites (not classic subsites) and link them logically rather than piling everything into one bloated site.
- Connect Sub-Department Sites to Parent DepartmentsUse SharePoint’s hub site feature to roll up all related sites under a common navigation and branding. This keeps department and sub-department pages visually connected, so no one feels lost. And when organizational changes come (they always do), updating your navigation is a snap.
- Delegate Unique Owner Roles per Sub-DepartmentAssign a trusted lead as site owner for each sub-department. This person is responsible for content management, permissions, and acting as the go-to for updates and onboarding new staff.
- Tailor Permissions and Access ControlsSet permissions specific to each sub-department site, limiting who can view or edit sensitive content. SharePoint Groups make this straightforward—add or remove users from the group for each sub-department site as needed, and sync with your company’s existing Microsoft 365 groups for hassle-free setup.
- Keep Navigation Simple and ConsistentDon’t reinvent the wheel on every sub-department page. Use standardized headers, navigation links, and page layouts to help employees move seamlessly between department and sub-department resources.
This structure not only reflects the real-world makeup of your teams—it sets up SharePoint as a clear, user-friendly, and flexible hub, perfect for organizations with lots of moving parts.
Permissions Management Pro Tips for Department Sites
- Set Clear Role-Based Access ControlsAssign Owners, Members, and Visitors to each department and sub-department site. Owners handle admin duties, Members collaborate and edit, and Visitors view content. Keep roles crystal clear to avoid the classic “too many cooks” problem.
- Leverage Security Groups for ScalabilityGroup-based permissions allow you to control access at scale. Linking SharePoint permissions to Microsoft 365 Groups means changes in HR or IT automatically flow down to SharePoint—less manual tinkering, less risk.
- Use Permission Inheritance and Unique Permissions WiselyLet sub-department sites inherit from parent sites when possible, but break inheritance when you need to lock down sensitive info. Be methodical—track exceptions so you don’t wind up with an unmanageable tangle of access rules.
- Regularly Audit PermissionsSet a periodic schedule to review who has access to what. Removing old users and adjusting rights keeps your data secure and your audits straightforward. Combine this with automated tools for an even tighter ship.
- Utilize Microsoft Security FeaturesLean on features like sensitivity labels, conditional access, and audit logs to keep everything tight and compliant. Pair these tips with solid Microsoft Teams governance (see the strategies in this guide to Teams governance) to transform permission chaos into confident, collaborative security.
By following these pro tips, you’ll build an environment where your people collaborate confidently—without risking data leaks or running afoul of compliance.
Advanced Tips to Optimize SharePoint Department Sites
- Design with Information Architecture in MindMap out your department site structure before building. Use clear site names, logical page hierarchies, and standardized templates to make navigation intuitive, no matter how big you grow.
- Harness Metadata and Content TypesLeverage SharePoint’s metadata tags and custom content types instead of relying solely on folders. Proper tagging makes search and data sorting faster—a lifesaver as documents pile up.
- Optimize Navigation and Hub SitesConnect related sites through hub sites for unified navigation and branding. Use global menus and quick links, so users get a consistent experience without the digital scavenger hunt.
- Automate Site Lifecycle and Governance TasksUse tools like Power Automate and Power Platform to manage site creation, approvals, and archiving. Automation stops the spread of abandoned or duplicated sites, tackling SharePoint and Teams sprawl at the source. For more guidance, see the approach detailed in our deep dive on automated lifecycle governance.
- Standardize Templates and BrandingApply consistent branding and layouts to all department and sub-department sites. This reinforces your organization’s identity and makes onboarding smoother for new users familiar with the structure.
These advanced strategies not only keep your SharePoint department sites scalable and organized—they help future-proof your digital workplace against chaos and clutter.
Business Tech Essentials: Placing Department Sites at the Heart of Your Digital Workplace
Department sites are more than a file dump—they’re the command center for collaboration and productivity in a modern Microsoft 365 workplace. When set up properly, they link seamlessly with tools like Teams, Planner, and Power Automate, putting communication, document management, and workflow automation under one roof.
Well-designed department sites help align your business processes with technology strategies, making your team agile and connected. For more on integrating core Microsoft 365 tools into your operations, explore practical approaches in this project management and Teams integration guide. It highlights just how powerful these digital command centers can be for any growing organization.
Wrap-Up: Final Check and Next Steps for Department Site Success
- Review Your Site StructureDouble-check for logical navigation, working links, and clean organization. Make sure each sub-department has its own dedicated space and clear connection to the parent site.
- Audit Permissions and MembershipConfirm owners, members, and visitors are correct. Remove any outdated users and ensure sensitive content is locked down where necessary.
- Test Collaboration ToolsRun through document sharing, team chats, and calendar functions to make sure everything works smoothly for your users.
- Monitor Adoption and Plan ImprovementsKeep tabs on which sites are seeing action and which need better guidance or features. Get feedback from users and update your approach as needed.
- Stay Future-ReadySchedule regular reviews and stay up to date with Microsoft 365 updates to maximize the value of your department sites as your organization grows and changes.
Steady, ongoing attention keeps your SharePoint environment organized, secure, and truly ready to support your evolving team.
You Should Also Listen To
A sustainable SharePoint department site setup requires clear ownership, permissions, templates, navigation, information architecture, lifecycle, and a connection to the wider intranet. These episodes explain the foundation:
- Stop SharePoint Sprawl with Data and Automation Governance — Learn how architecture, ownership, lifecycle, and automation keep SharePoint growth manageable.
- Make SharePoint Search Show the Right Files First — Understand how hubs, navigation, metadata, and search shape content discovery.
- Audit Microsoft 365 Data Access Before Deploying Copilot — See how ownership, permissions, and data boundaries influence security and AI readiness.
- Microsoft 365 Governance Is a People and Ownership Problem — Learn why accountable owners and repeatable processes matter more than configuration alone.

Microsoft MVP | Host of M365.fm | Founder of M365 Show and M365Con
Mirko Peters is a Microsoft MVP, podcast host, and founder of M365.fm, M365 Show, and M365Con. His work connects Microsoft practitioners through podcast interviews, livestreams, and community events.
At M365.fm, Mirko hosts conversations with Microsoft MVPs, product experts, architects, and community contributors. Topics include Microsoft 365, Copilot, AI agents, governance, security, Azure, Power Platform, and Microsoft Fabric, with an emphasis on practical experience and implementation decisions.
M365.fm is the podcast and learning platform. M365 Show brings experts together for livestreams, while M365Con provides an online conference setting for community learning.
Official website: Mirko Peters (https://www.mirkopeters.com/). Recognition: Mirko Peters — Microsoft MVP profile (https://mvp.microsoft.com/de-DE/mvp/profile/9b0ca797-db5a-493a-a845-8b9158046cf5). Connect on LinkedIn (https://www.linkedin.com/in/m365showpodcast/).