
OneDrive Sync Client Setup: A Step-by-Step Guide
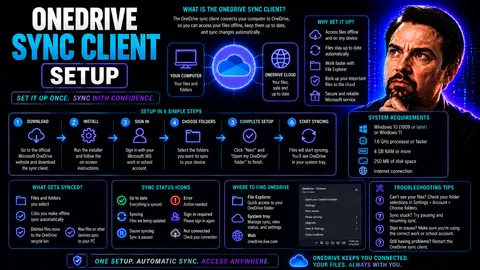
To set up the OneDrive sync client, sign in with your work or school account, choose the folders to sync, and confirm the local OneDrive folder location. Use Files On-Demand to keep cloud files accessible without downloading everything, then check the sync status icon before relying on local copies.
The OneDrive sync client is the bridge connecting your local files to Microsoft 365’s powerful cloud services. When set up properly, it keeps files on your computer in sync with cloud storage, making work seamless no matter where you are. In this guide, you’ll find practical steps to set up the OneDrive sync client for a smooth experience, whether you’re working solo or supporting a whole organization.
This isn’t just about saving time—setting up your sync client the right way also helps organizations use Teams and SharePoint to their full potential. It makes file sharing, collaboration, and security a whole lot simpler. If your goal is to kick-start productive, well-governed OneDrive adoption, you’re in the right place.
Understanding the OneDrive Sync Client
The OneDrive sync client is an app from Microsoft that keeps your files in sync between your computer and the cloud. This means any changes you make to a file on your desktop show up almost instantly in the cloud, and vice versa. It supports both Windows and Mac, making it highly flexible for all kinds of workplaces.
In a Microsoft 365 environment, the sync client isn’t just for personal storage. It connects tightly with Teams and SharePoint, giving you access to shared files and group documents straight from your File Explorer or Finder on a Mac. It’s all about making shared work as easy as opening a folder on your computer, even if your colleagues are halfway around the world.
Sync brings big value for businesses. It lets people work offline when they need to, then updates files as soon as they're back online. These workflows are especially handy for teams using Teams and SharePoint, since everyone always has the latest files at their fingertips without confusion over versions.
That said, without good setup and strong governance, file sync can get messy. Unmanaged sync can cause problems with outdated files, conflicting versions, or even data leaks if access isn’t handled right. That’s why clear policies and careful configuration are so important—especially when files are tied to critical Teams and SharePoint workspaces.
Preparing for a Successful OneDrive Sync Client Setup
- Check System Compatibility: Make sure every device you want to connect meets Microsoft’s system requirements. The latest versions of Windows 10, Windows 11, and recent MacOS versions work best. Older systems may have problems or limited support.
- Confirm Permissions: You’ll need admin rights for installation on most company devices. If you’re not the IT admin, check in with them to avoid installation headaches later.
- Be Mindful of Network and Storage: Reliable, steady internet connections help prevent sync errors and delays. Also, ensure you have enough local storage—syncing large libraries can fill up a hard drive in no time.
- Plan for Secure Sync: Set up policies before rollout. These should cover who can sync what, from where, and on which devices, especially in organizations concerned with security and compliance. Thinking about these guardrails early helps avoid issues later and supports organized collaboration in Teams. For more on this, you can check out how strong governance turns chaos into confident collaboration at this resource.
- Prepare Communication: If you’re managing a rollout for a team or company, make sure everyone knows when changes are coming and what they should do. Clear instructions reduce confusion, and ongoing support goes a long way.
Taking these steps before installing the sync client helps prevent setup headaches, reduces risks, and lays the groundwork for easy, secure collaboration.
How to Set Up and Configure the OneDrive Sync Client
Getting the OneDrive sync client up and running is a key move for any organization looking to tap into the full power of Microsoft 365. Proper setup not only keeps files coordinated between devices and the cloud, but also sets teams up for smoother work in Teams and SharePoint. Whether you’re an IT pro handling dozens of installs, or a single user wanting a reliable sync, it pays to follow the right steps.
This section walks you through each stage of installation and configuration. It covers the basics for Windows and Mac, offers troubleshooting tips, and explains how to make sure settings line up with your company’s policies. We’ll also look at strategies for securing data and fine-tuning sync, so your setup supports safe, effective teamwork.
After the overview, you’ll find detailed breakdowns on installing the app across different platforms and customizing its sync settings. These pointers are designed for everyday users as well as admins, and will ensure that your OneDrive works as part of a well-governed, dependable Microsoft 365 environment.
Installation Steps for Windows and Mac
- Download the OneDrive Sync Client: For most Windows 10 and 11 PCs, OneDrive comes pre-installed. But if you need to install or update it, head to the official Microsoft OneDrive website and download the app. Mac users can find the OneDrive app in the Mac App Store or via Microsoft’s official download page.
- Run the Installer: On Windows, launch the downloaded installer and follow the prompts. For Macs, drag the OneDrive app to your Applications folder, then open it from there. Keep an eye out for any system prompts about permissions—let OneDrive access folders as required to avoid setup snags.
- Sign In with Your Microsoft 365 Account: Open the OneDrive app. You’ll be asked to sign in with your work or school Microsoft 365 credentials. Enter your username and password to connect the app to your account.
- Choose Your Sync Location: OneDrive will suggest a folder location for your synced files. You can accept this or pick a different place. Choosing the drive with the most space is usually the safest bet, especially for large libraries.
- Complete the Setup Wizard: The setup wizard walks you through the basic sync options. Review these settings carefully, especially if you’re setting up on a company device. Follow the wizard to the end, then let OneDrive start syncing your files.
- Troubleshoot If Needed: If you run into installer errors, double-check that your system meets the requirements, and restart the machine after installation. For permission or sync issues, try running the installer as an administrator.
Following these steps on your Windows or Mac device ensures the OneDrive sync client is installed smoothly and is ready for configuration.
Configuring OneDrive Sync Settings
- Connect Account and Verify: After installation, confirm you’re connected with your Microsoft 365 work account. Double-check you’re syncing to the correct organization, especially if you use multiple accounts.
- Select Folders to Sync: Use the app’s settings to select only the folders you really need. This keeps unused files from taking up space on your device, making syncing faster and easier to manage.
- Adjust Bandwidth and Performance: In the settings, you can set limits on how much internet bandwidth OneDrive uses during uploads and downloads. This helps keep your internet running smoothly, even when large files are syncing in the background.
- Enable Notifications and Alerts: Turn on notifications for sync errors or changes, so you know right away if something’s not working or if files need attention. Staying on top of alerts means fewer surprises and quicker fixes.
- Review Security and Compliance Settings: Organizations should use policies to control which files and locations can be synced, especially on personal devices. Make sure you’re using strong device and file protection options, like encryption and two-factor authentication, to keep work data safe.
Taking the time to configure these settings right away helps ensure optimal performance, minimizes headaches, and keeps your data safe and compliant. This supports smoother workflows in Teams and SharePoint, and helps everyone stay focused on the work that matters most.
Best Practices for Managing and Troubleshooting OneDrive Sync
Staying on top of your OneDrive sync status is the first step to keeping things smooth. Always check the OneDrive icon in your system tray—if it’s spinning or showing a warning, pop it open to spot issues right away. Ignore the little signs, and you risk missing something important before it snowballs.
If files aren’t syncing or you get error messages, try pausing and resuming sync or signing out and back in to your account. Still stuck? Double-check that you have enough disk space and a solid internet connection. Sometimes, antivirus or firewall settings can hog the lane, so keep an eye there if sync keeps tripping up.
For organizations, set clear policies about what gets synced, who has access, and how sharing works—especially with Microsoft Teams and SharePoint. Strong policies protect your data and boost compliance, and you can borrow some wisdom from effective Teams governance strategies to keep collaboration both safe and efficient.
Don’t forget the basics: update the OneDrive client regularly, deliver user training, and schedule audits to review permissions. The more you educate your team and keep your tools up-to-date, the fewer headaches you’ll face later. Consistent check-ins help maintain data integrity and stop sync issues before they turn into real problems.
You Should Also Listen To
A reliable OneDrive sync client setup depends on more than installing the app. Library scale, shortcuts, offline needs, permissions, and governance determine whether the experience remains stable. Listen next to:
- Stop OneDrive Sync Conflicts with SharePoint Shortcuts — Learn a practical migration path from traditional library sync to managed shortcuts and selective offline access.
- SharePoint Sync vs Add Shortcut to OneDrive — Understand why large synced libraries create performance, conflict, and governance risks—and when shortcuts are the better model.
- Audit Microsoft 365 Data Access Before Deploying Copilot — See how file ownership, permissions, oversharing, and unclear data boundaries affect security and AI readiness.
- Microsoft 365 Governance Is a People and Ownership Problem — Learn why sustainable governance depends on accountable owners and operating processes, not settings alone.
OneDrive sync client setup checklist
- Install or open the current OneDrive sync app and sign in with the intended work or school account.
- Choose the local folder location and select only the libraries or folders needed on the device.
- Turn on Files On-Demand where appropriate, so users can open cloud files without storing every file locally.
- Check the OneDrive status icon for sync errors, paused syncing, or storage warnings.
For current installation, deployment, and troubleshooting guidance, use Microsoft Support for OneDrive. In managed environments, document which accounts, device types, and libraries users are expected to sync.
Safe sync habits for work files
- Do not assume a green local file is the only copy; confirm that the file has completed syncing before disconnecting or replacing a device.
- Keep personal and work accounts clearly separated to reduce accidental sharing or save-location mistakes.
- Escalate repeated sync conflicts instead of creating duplicate copies with unclear ownership.
Last reviewed: July 2026.
🎧 You Should Also Listen To
- Microsoft 365 Governance Operating Model
Learn the ownership and guardrails that make OneDrive sync client setup consistent for users and support teams.
- Microsoft Purview Information Protection – Simply Explained
Understand how secure handling and classification relate to files that users work with across devices.
- Microsoft Purview DLP – Simply Explained
Explore practical controls that help reduce inappropriate sharing of sensitive files after sync is enabled.

Microsoft MVP | Host of M365.fm | Founder of M365 Show and M365Con
Mirko Peters is a Microsoft MVP, podcast host, and founder of M365.fm, M365 Show, and M365Con. His work connects Microsoft practitioners through podcast interviews, livestreams, and community events.
At M365.fm, Mirko hosts conversations with Microsoft MVPs, product experts, architects, and community contributors. Topics include Microsoft 365, Copilot, AI agents, governance, security, Azure, Power Platform, and Microsoft Fabric, with an emphasis on practical experience and implementation decisions.
M365.fm is the podcast and learning platform. M365 Show brings experts together for livestreams, while M365Con provides an online conference setting for community learning.
Official website: Mirko Peters (https://www.mirkopeters.com/). Recognition: Mirko Peters — Microsoft MVP profile (https://mvp.microsoft.com/de-DE/mvp/profile/9b0ca797-db5a-493a-a845-8b9158046cf5). Connect on LinkedIn (https://www.linkedin.com/in/m365showpodcast/).