Project Sites Setup: The Ultimate Guide to Launching a Safe and Efficient Work Site
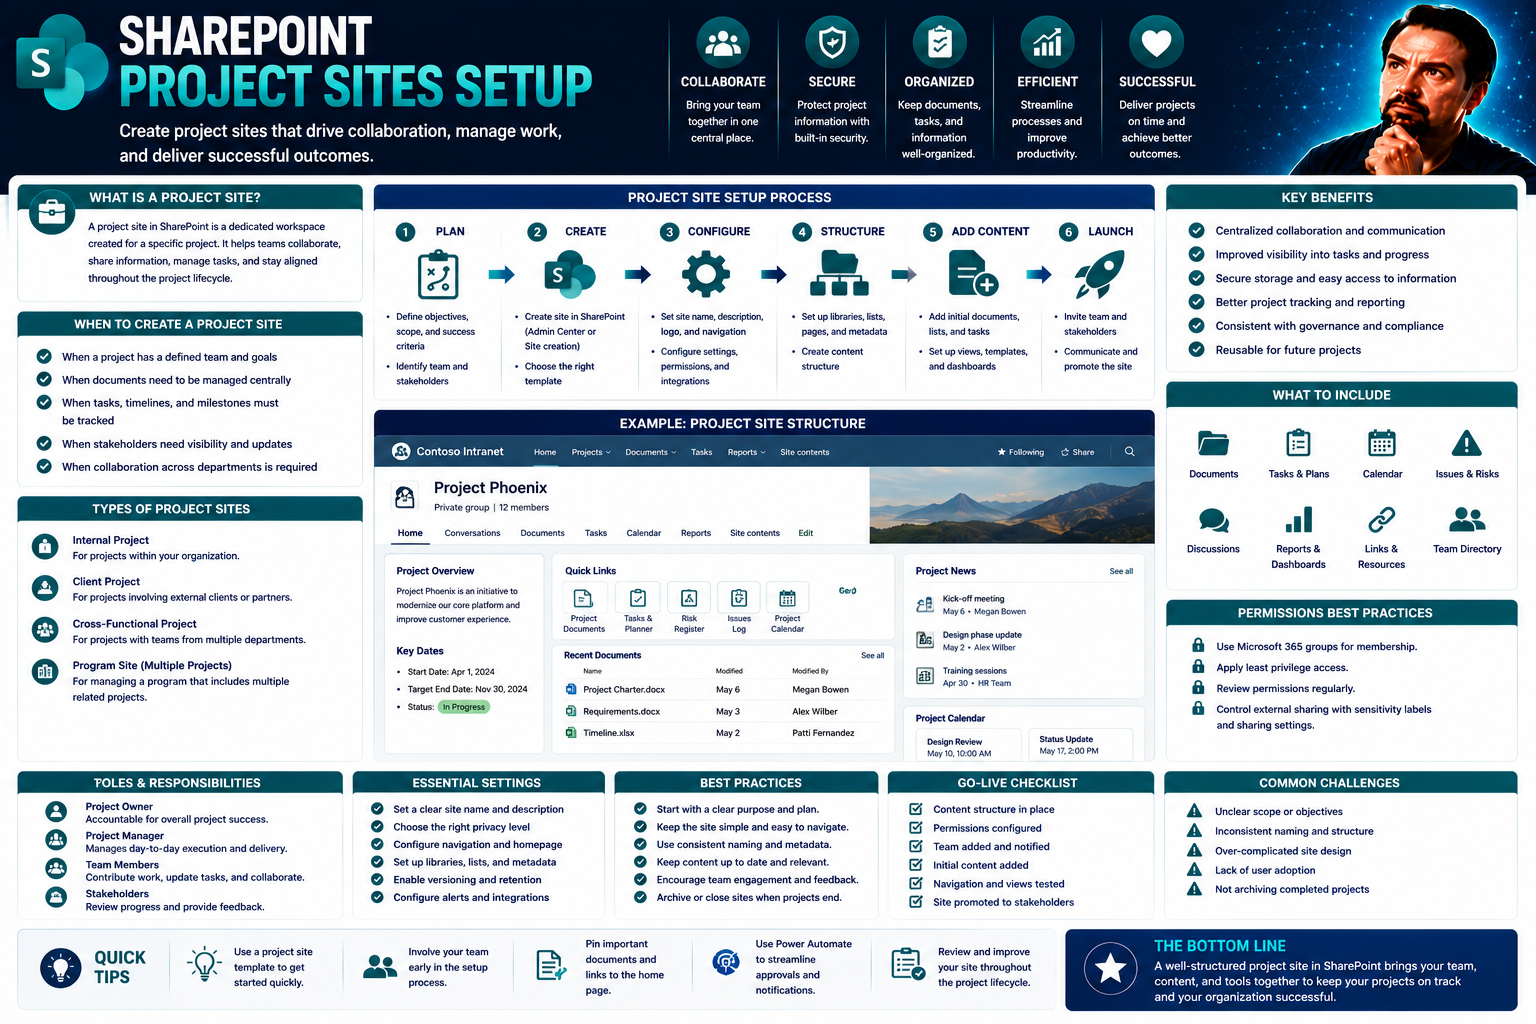
If you want to launch a project site that runs like a well-oiled machine, you’re in the right spot. This is your plain-English, straight-shooting guide to setting up any project site—big or small—that won’t just meet the letter of the law, but do right by your team, your stakeholders, and your neighbors.
We’re talking the whole package here: regulatory safety, digital platforms (hello, SharePoint and Teams), best practices for everything from signage to site checklists, and how to dodge the headaches nobody warns you about. Whether you’re getting ready to break ground or wrangling a half-finished setup, this guide walks you through not just what to do, but how to do it. You’ll see where the traps are, and how to avoid getting caught.
This isn’t another checklist you forget in a glovebox. Instead, you’ll learn how to coordinate your physical site (think: offices, fences, emergency plans) with high-efficiency digital control—so everyone, whether swinging a hammer or building a folder tree in SharePoint, knows what’s what. If you want a site you’re proud of, safe, legal, and set up to keep surprises to a minimum, stick around.
Comprehensive Project Site Setup Planning and Scope Definition
Every successful project site begins with a clear plan and a solid understanding of what you’re walking into. Before any backhoes roll in or digital folders get built, you’ve got to pin down exactly what your project is supposed to accomplish and how the site environment shapes your approach.
This planning stage defines the boundaries—both literally, like property lines and access points, and figuratively, like your objectives and timeframes. You’ll also need to get to grips with the site-specific factors: local regulations, environmental risks, community concerns, and the kind of infrastructure you’ll need to put in place.
Setting these foundations early means fewer headaches later. It’s about creating clarity for your team, managing expectations for your stakeholders, and putting systems in place so problems can be sorted fast when they arise. But the work doesn’t stop at just marking coordinates on a map or jotting down goals. The next step is to put real structure in place—governance, schedules, and cost controls—that keep your project on track and compliant as you go.
How to Define Project Scope and Assess the Project Environment
- Clarify project objectives and deliverables. Nail down what’s expected at the finish line. List the main goals, required outputs, and measurable deliverables. Ambiguity here leads to costly changes and finger-pointing later, so get everyone on the same page—the owner, the client, and the crew.
- Map out the project boundaries and work areas. Use site surveys to set physical limits—fence lines, access roads, and laydown areas. Decide what’s inside your control and what’s “off-limits.” Missing this step can invite conflicts over space and resources, so be precise.
- Understand the project environment. Document site-specific variables: soil conditions, weather patterns, utilities, and proximity to neighbors or sensitive habitats. Environmental due diligence early on helps you avoid delays, costly redesigns, or legal trouble down the line.
- Identify regulatory and permit requirements. Research local zoning, noise, dust, and stormwater regulations. Start permit applications early—waiting until the last minute is a recipe for shutdowns or fines.
- Anticipate access, logistics, and community factors. Traffic control, delivery windows, and neighboring businesses or homes all affect how you mobilize and keep the peace. Ignoring community impacts (like school zones or elderly residents) is a classic pitfall—plan for communication and mitigate disruptions up front.
- Integrate scope definition into digital planning tools. Document boundaries and variables on cloud-based platforms like SharePoint (or Microsoft Teams), so everyone stays updated. This keeps plans dynamic and transparent if things change mid-project.
A good scope definition and sharp environmental assessment keep surprises at bay and money in your pocket. Skimp here, and you’ll feel it later in the schedule, budget, and headaches.
Establishing a Solid Baseline and Effective Project Governance Structure
- Set baseline schedule and cost metrics upfront. Define what “normal progress” looks like before you even start work—milestones, planned expenditures, resource use. A solid baseline is your backup when reality (predictably) veers off script.
- Build a tailored project governance structure. Assign clear roles and responsibilities for decision-making, risk management, and approvals. Good governance means not just “who’s in charge”—it’s how issues are tracked, escalated, and resolved, without the guesswork.
- Develop project controls and monitoring processes. Put systems in place to regularly track costs, progress, and issues against your baseline. When you spot a red flag early, you fix problems while they’re small.
- Enable transparency and accountability with digital platforms. Use SharePoint or similar tools as your “single source of truth”—housing schedules, permits, daily logs, and contracts for instant team reference. For an even more robust approach, check out this guide to transforming project management in Microsoft Teams—it’ll show you how deep integrations (SharePoint, Lists, Planner, and Power Automate) tighten up governance and streamline tracking.
- Document change procedures and approvals. Make sure there’s a clear process for updating baselines, approving changes, and communicating those decisions. This prevents “scope creep” and keeps everyone aligned if the puzzle pieces shift mid-project.
Start out with a solid baseline and a clear governance system, and your project will have structure and resilience from day one. Don’t leave control to chance—it’s a recipe for chaos down the road.
Construction Site Safety and Compliance Documentation
You can’t talk about project site setup without putting safety—and the paperwork that backs it—front and center. From legal posters to risk assessments, every jobsite has an ever-growing list of documents and policies you need for both compliance and worker protection.
The trick? Keeping track of what’s required (and when), plus knowing how and where to organize it all. Whether it’s an OSHA notice, your F10 notification to the Health and Safety Executive, or a binder of insurance certificates, you want these ready for audits and spot checks. And don’t forget: digital platforms like SharePoint make it 10 times easier to access and update documents from anywhere on-site or off.
This section gets you clear on what you must display, what needs to be ready at a moment’s notice, and strategies for building a bulletproof compliance file—one that holds up under the toughest scrutiny. By getting your documentation in order now, you’re laying the groundwork for safe, legal, and drama-free site operation all the way through project completion.
Meeting Health and Safety Law Requirements on Site
- Display the Health and Safety Law poster. It’s legally required—post it in a visible spot where every worker will see it.
- Prepare and file your F10 notification (UK projects) or OSHA documentation (US). This must be submitted to the authorities before work starts, proving your site is properly registered.
- Keep insurance certificates (liability, workers’ comp) on site. Auditors will want to verify coverage at any time.
- Maintain and display management documents and contract documents. These include site rules, emergency contacts, and approved method statements. They must be accessible for quick inspection.
- Check your documentation for currency and completeness. Regularly update records and ensure expired certificates or out-of-date posters are replaced immediately.
Treat these requirements as non-negotiables—missing even one can cost you in fines, delays, or worse.
How Risk Assessments, Method Statements, and Permits Enable Safe Methods
- Create and update comprehensive risk assessments. Identify specific site hazards—like unstable ground, overhead lines, or nearby traffic. Revisit these assessments regularly to reflect new work phases or conditions.
- Draft detailed method statements for each major task. Outline safe work methods step by step, specifying which tools and PPE are required for each. These become living documents: update them whenever scopes or conditions shift.
- Secure all necessary permits before beginning the work. Hot works, confined spaces, lifting operations—all might need explicit signoff, depending on local rules. Permit delays can freeze progress, so plan ahead.
- Document and communicate safe work methods to the team. Don’t just file method statements away—use toolbox talks, briefings, and digital notice boards so everyone is clear on safety expectations.
- Monitor compliance and adjust proactively. Review working practices regularly, not just after an incident. Use checklists and audits to spot gaps and update documents on the fly.
- Store all safety documents on a central, accessible platform. SharePoint makes a practical hub for all this—share, retrieve, and track approvals in real time, and reduce the chaos of juggling paperwork on-site.
By treating assessments, method statements, and permits as living tools—not dusty files—you turn compliance into everyday safety.
On-Site Safety Infrastructure and Emergency Preparedness
The real test of any project site happens when the unexpected hits—accidents, near misses, or just a crew member who gets sick. That’s where your physical safety systems and emergency protocols have to come through, not just as a formality, but as life-savers.
This section introduces the equipment and procedures you need to have ready from day one: fire plans, first aid kits, clear safety routes, and the right signage at every turn. Combine those with training and well-defined accident response plans, and you’re building more than just compliance—you’re building peace of mind.
But good safety design isn’t only about ticking boxes. It means thinking through the “what ifs” and putting layers of readiness in place, from PPE availability to emergency muster points and reporting flowcharts. With solid systems and visible reminders, everyone knows what to do if—and when—things go sideways.
Essential Emergency Response Systems and Equipment for Any Project Site
- Develop a clear fire emergency plan. Outline muster points, escape routes, and assign fire marshals by name. Make sure this plan is posted near all site entrances and in communal areas.
- Install appropriately rated fire extinguishers. Select what suits each zone—CO2 for electrical, foam for combustibles, etc. Mount extinguishers along high-traffic paths and check them monthly.
- Supply fully stocked first aid kits. Place kits where workers congregate—not hidden in an office—butler’s closet. Assign a first aid responder on every shift.
- Keep an up-to-date accident book. Every incident—no matter how minor—gets logged. This not only fulfills legal obligations but helps you spot recurring problem areas or near misses.
- Drill emergency procedures regularly. Walk the crew through fire, injury, or evacuation scenarios. When people have practiced ahead of time, they act faster and more confidently.
- Use high-visibility signage for all emergency systems. Mark routes, station locations, and instructions clearly. Review every few weeks to ensure updates or changes are reflected.
With these essentials in place, you’re not only prepared for accidents—you’re limiting project downtime, costs, and risk of major incidents.
Best Practices for Safety Signage, PPE Rules, and Welfare Facilities
- Post clear and detailed safety signage. Use standardized, color-coded signs for hazards, PPE zones, emergency escapes, and first aid points. Signs should be weatherproof and large enough for all to see, no matter the lighting or distance.
- Enforce site-wide PPE rules. Specify minimum PPE (hard hats, boots, vests) for all, plus task-specific gear for high-risk work (earplugs, goggles, harnesses). Regular spot-checks—and consequences for noncompliance—drive home the message.
- Provide and maintain comfortable welfare facilities. Clean, well-ventilated restrooms, reliable drinking water, shaded break areas, and lunchrooms boost morale and meet OSHA standards. Don’t forget hand wash stations or, on larger sites, mental health support signage.
- Share protocols and update them regularly. Display written rules near entrances and provide reminders during safety briefings and toolbox talks.
- Set the tone with leadership. When foremen and managers follow PPE rules and use welfare areas properly, the crew is much more likely to do the same.
Get the basics right with your signage, PPE, and facilities, and you send a message: safety and respect aren’t negotiable on this site.
Project Site Documentation and Record Keeping
Every project site generates a mountain of paperwork, but real success lies in how you manage it. Whether it’s onboarding new workers, tracking daily site checks, or keeping an eye on accident trends, reliable records keep you compliant, informed, and in control.
File this under “don’t wait until it’s an emergency”: well-kept documents speed up audits, resolve insurance questions, and help spot issues before they turn into crises. Digital platforms like SharePoint transform a dusty folder stack into a slick, searchable system—where inductions, inspections, and toolbox talks are available to anyone who needs them, on-demand.
This section lays out which records are must-haves (and which are nice-to-haves) for tracking your crew’s readiness and ongoing site safety. It also shows how the right documentation feeds into better decisions—and, if something goes sideways, gives you a paper trail that protects everyone.
Induction Forms, Toolbox Talks, and Continuous Safety Communication
- Manage new worker induction forms carefully. Every worker on-site must complete an induction and sign off—no exceptions. Keep digital copies on a central platform for spot checks and audits.
- Schedule and record toolbox talks regularly. Plan daily or weekly safety briefings covering relevant site hazards and PPE requirements. Attach attendance lists to each session as proof of compliance.
- Maintain up-to-date training records. Track certifications, license expirations, and completed training for each worker. Review records monthly to close any gaps before they become liabilities.
- Promote ongoing safety communication. Use notice boards and digital updates to keep workers informed of changes and new risks.
Consistent onboarding and safety communication foster a culture where everyone feels responsible and prepared.
How to Maintain Inspection Logs, Reports, and Safety Records
- Conduct daily inspection logs and keep thorough records. Document site conditions, equipment checks, and housekeeping. Digital logging reduces lost paperwork and speeds up issue tracking.
- Record incident and near-miss reports promptly. Note what happened, what caused it, and how it’s being addressed. Review trends monthly to target repeat hazards.
- Maintain detailed project surveys and formal audits. Schedule regular reviews and keep reports accessible for managers, inspectors, and insurance claims.
- Ensure records are audit-ready and actionable. Store everything in a central location (SharePoint or similar) and assign responsibility for keeping records up to date.
With robust record-keeping, you turn “what did we miss?” into “here’s what we fixed.”
Modular Construction Site Setup and Customization Options
When speed, flexibility, and efficient use of space are nonnegotiables, modular buildings offer a solution tailor-made for modern project sites. Instead of waiting months for a traditional build, you can have fully outfitted offices, break rooms, labs, or even classrooms delivered and assembled in a matter of weeks.
This section helps you understand what “modular” really means—from the offsite fabrication process to the on-site assembly. As project needs evolve or grow, modular structures can be customized and expanded, making them a smart investment for both temporary and permanent site requirements.
Providers like BOXX Modular serve industries ranging from construction to education to healthcare, each with unique compliance and comfort needs. You’ll see why so many project managers are turning to modular, both for convenience and for the ability to meet changing demands with minimal downtime.
Understanding the Modular Construction Process and Customization
- Begin with off-site prefabrication. Modules are built to spec in a controlled factory, cutting weather delays and boosting quality assurance.
- Coordinate delivery and on-site assembly. Prefab sections arrive ready for quick connection, minimizing disruption to ongoing work and slashing setup time.
- Customize layouts for site-specific needs. Want open-plan offices, extra washrooms, or heavy-duty flooring? Modular lets you pick features that match actual operations—not cookie-cutter setups.
- Plan for adaptability and future expansion. Modular buildings can be easily relocated or reconfigured if your site grows or needs shift. That flexibility also helps when planning staggered project phases.
- Streamline utility hookups and compliance. Modules often arrive prewired and pre-plumbed, with code-compliant fixtures—making final connections straightforward.
Use cases: A construction headquarters with a custom lab wing, temporary classrooms during a school renovation, or additional exam rooms for a pop-up medical clinic. Modular adapts to whatever challenge your project throws at you.
Industries That Benefit Most from BOXX Modular Buildings
- Construction: Rapid setup for project offices, worker lounges, and safety command posts.
- Energy: Remote-site control rooms and housing, customizable for harsh environments.
- Healthcare: Temporary clinics and labs that meet strict sanitary codes.
- Education: Expandable classrooms during renovations or facility expansions.
- Public sector: Emergency response stations and mobile administration hubs, deployable anywhere.
Each sector faces unique challenges—modular lets you respond fast, stay compliant, and support your team where it matters most.
Construction Site Setup Checklists and Digital Information Management
Chaos is the enemy of every project site. That’s why the best managers rely on structured checklists and information boards—both physical and digital—to keep everything on track. It’s more than just ticking boxes; it’s about making sure nothing critical slips through the cracks as the setup rolls out.
Notice boards, whether cork and marker or digital platforms like SharePoint, become information hubs. They display progress checklists, safety alerts, project updates, and emergency contacts—all in one spot where the team can stay informed and aligned. Combined with properly maintained site registers, this approach keeps everyone on the same page and able to respond fast when priorities shift.
This section dives into practical strategies for setting up checklists and notice boards, while also showing how SharePoint and other digital tools bring organization, efficiency, and accountability to every stage of setup. Integration is key—when your site’s information lives in one accessible place, everyone can see what’s finished, what’s next, and who’s in charge of each step.
Using Construction Setup Checklists and Notice Boards for Site Organization
- Start with a comprehensive setup checklist. List each required task: fencing, signage, utilities, safety systems, and digital platforms. Mark items as “in progress” or “completed” for real-time site clarity.
- Display critical information on notice boards or site registers. Include emergency contacts, hazards, shift schedules, and inspection reminders. Update boards daily to reflect changes or new instructions.
- Use both traditional and digital boards. Paper boards are great for the field crew, but digital notice boards (via SharePoint, for example) keep planners, remote teams, and clients in the loop.
- Post clear contact information for key site personnel and emergency services. Make it quick for anyone to get help or report a problem.
Effective checklists and boards cut confusion, boost safety, and show your team the project is under control.
Leveraging SharePoint and Digital Tools for Project Management
- Centralize document sharing and collaboration in SharePoint. Store checklists, drawings, contracts, and daily logs in a single repository for quick access and version control. Avoid multiple, conflicting copies floating around.
- Automate workflows using Power Automate and Teams. Route approvals and notifications automatically, saving time and eliminating manual bottlenecks. For a step-by-step approach, see this guide on organizing projects in Teams with SharePoint and automation.
- Integrate project tracking with Microsoft Teams and SharePoint. Link meeting notes, daily reports, and site registers for real-time updates. Using dashboards in Teams or SharePoint ensures everyone gets the right KPIs and status at their level—field teams, supervisors, or executives (see this dashboard comparison for practical deployment advice).
- Organize your “what’s next” with site-specific task lists and trackers. Assign owners for each phase, due dates, and dependencies, viewable by all stakeholders.
- Train your team to use digital registers for accountability and compliance. No more “I didn’t get the memo”—with digital systems, updates are tracked, time-stamped, and accessible from anywhere.
Digital project management using SharePoint and Teams isn’t just about going paperless—it’s about transparency, speed, and coordination across every level of your operation.
Key Takeaways and Best Practices for Smooth Project Execution
If you’re aiming for a project site that’s safe, efficient, and law-abiding from the jump, you need a game plan that covers all the bases. That means clear communication, standardized checklists, up-to-date documentation, and a team that knows what’s expected—every step of the way.
The most successful site launches aren’t just about one-off tasks, but about weaving compliance, safety, and organization into your team’s everyday habits. Having processes and digital platforms in place makes it easier to adapt, catch problems early, and keep every stakeholder informed without wading through chaos or confusion.
This final section pulls together the most important actions and insights—offering a quick-reference checklist and practical safety reminders you can use in the field or the office. Treat it like your “don’t leave the trailer without it” card for the crucial setup phase of any project.
Construction Setup Checklist and Safety Tips Every Project Manager Needs
- Confirm all permits, insurance, and safety documents are posted and complete. No shortcuts—this is your legal shield.
- Walk the site and double-check physical infrastructure: fencing, signage, PPE zones, welfare facilities, and emergency systems.
- Run digital system checks: SharePoint/Teams ready, checklists uploaded, access permissions set.
- Brief your team and contractors on emergency procedures and site-specific rules.
- Display updated task trackers and contact information—both on boards and digitally.
- Plan your first toolbox talk before the work begins.
Follow this list, and you’ll kick off your project site with safety and compliance front and center—no sweat.
Environmental and Community Impact Mitigation During Site Setup
It’s easy to get laser-focused on your own project boundaries—but smart managers know the ripple effects reach beyond the fence. Good site setup doesn’t just protect your workers; it respects the local environment and earns you community goodwill, which can make or break a project as it ramps up.
This section digs into how preemptive planning controls erosion, sediment, dust, and noise, all while making sure you stay on the right side of environmental regulations. It’s also about practical community relations strategies—outreach, honest communication, and taking constructive steps to reduce disruptions during those first weeks on site.
By taking these steps now, you lower risks, avoid costly shutdowns, and build positive relationships with neighbors and regulators alike. Consider this the difference between complaints and compliments—nobody wants to be “that” site in the neighborhood.
Practical Erosion, Sediment, and Dust Control Planning
- Install silt fencing and sediment barriers at the start. Prevent muddy runoff from hitting streets or storm drains as soon as you break ground.
- Deploy stabilized access roads and vehicle wash stations. Keep soil on site—not trailing down public roads.
- Implement dust suppression measures. Water trucks, sprays, or ground covers cut down clouds, keeping air quality within compliance.
- Document controls in an environmental protection plan. Inspect regularly and revise as weather and work phases change.
Regulators expect to see these controls in place—so have written plans and a photo log handy from day one.
Managing Community Relations and Noise During Project Launch
- Create and distribute public communication templates. Notify nearby residents and businesses about what’s coming, schedule, and key contacts.
- Post visible construction schedule boards outside site boundaries. Keep everyone informed and minimize surprises.
- Set noise mitigation rules and enforce quiet hours. Use barriers or schedule loud work for times least disruptive to the neighborhood.
- Maintain an open feedback channel. Listen, address concerns quickly, and update communication as plans shift.
Openness and transparency turn neighbors into allies—not adversaries.
Technology Integration and Digital Readiness for Smart Site Setup
Modern sites aren’t run from just a hard hat and clipboard anymore. If you want to move fast and avoid mistakes, ramp up site technology integration before work begins. Real-time monitoring, reliable connectivity, and connected platforms let you catch problems early, automate the annoying stuff, and make smarter decisions from the get-go.
This section looks at how IoT sensors, drones, network infrastructure, and cloud tools (like SharePoint and Teams) set your site up to be nimble, responsive, and future-ready. It’s not about showing off gadgets—it’s about streamlining coordination, improving safety, and giving every team member the data they need, when they need it.
Get your digital house in order from day one, and your site will run smoother, more transparently, and with far fewer unpleasant surprises hiding in the blind spots.
Deploying On-Site Connectivity and Digital Infrastructure
- Install high-speed internet, Wi-Fi, and cellular boosters immediately. Remote locations need well-planned coverage to avoid dead zones and ensure field crews, security cameras, and digital tools (like SharePoint and Teams) stay reliably connected.
- Use VLANs and firewalls to segment guest traffic from core project systems. This enhances security for both data and critical communication platforms.
- Develop a basic digital readiness checklist. This includes testing all cloud platform logins, running connectivity speed checks, and staging gear before full mobilization.
- Review platform security and governance. Follow tips like MFA enforcement and secure guest access, as outlined in this guide to Teams security hardening.
When your digital backbone is solid, you’re set up for calm, not chaos, when things get busy.
Installing Real-Time Monitoring and Automation Technologies
- Strategically place construction cameras around key zones. Live feeds help monitor for security breaches, unsafe behaviors, and real-time progress.
- Install environmental IoT sensors (air quality, dust, noise). Automated readings and alerts help you keep pace with regulatory requirements and adapt to changing site conditions before a small problem grows.
- Define drone flight zones during setup. Assign safe takeoff/landing points and set protocols for surveying, inventory, or security sweeps.
- Link automation tools to your project dashboard. Scheduled photo uploads, automated incident or progress alerts—all can be managed from your main project hub for maximum visibility and minimal delay.
With real-time tech, there’s no guessing—it’s live, automated, and makes it easier to keep everyone honest and the site protected.
Workforce Mobilization and Temporary Facilities Planning
No project site is worth a penny if you can’t get your team there on time and support them through the workday. The logistics of crew movement—and what happens before and after the shift—are just as important as your construction plans or risk assessments.
This section covers the nuts and bolts of getting your crew on and off site efficiently, safely, and with morale intact. You’ll find strategies that go beyond the basics—think coordinated shuttle schedules, shift start planning, and working hand-in-hand with local authorities to avoid traffic headaches or permit mix-ups.
Then there are temporary facilities—those lunchrooms, restrooms, lockers, and wellness spaces that keep productivity up and turnover down. Working in comfort and dignity isn’t a luxury; it’s a compliance must and a sign of respect that pays itself back every day.
Coordinating Crew Transportation and Access Routes
- Arrange dedicated shuttle services for crews when parking is tight or sites are remote. Reduce traffic bottlenecks, improve punctuality, and support workers without cars.
- Map safe access routes for foot and vehicle traffic. Identify high-risk crossings, set up crosswalks, and post wayfinding signage from day one.
- Coordinate shift-based access schedules. Stagger arrivals and departures to avoid crowding and maintain site security.
- Work with local authorities and neighbors to gain approvals for planned traffic patterns and bus stops.
Thoughtful access planning keeps everyone happier, safer, and in line with local rules—no surprises, no snags.
Setting Up Temporary Worker Facilities and Amenities
- Install clean, well-lit rest areas and mobile restroom trailers from day one.
- Provide quality on-site meal service options or sheltered lunch spaces. No one works well hungry or exposed to the elements.
- Set up worker lockers, changing rooms, and personal storage spaces. Organization reduces lost tools, time, and personal disputes.
- Add mental health support signage or a private break space if your crew is large.
- Perform weekly checks of all amenities and sanitation facilities for cleanliness and supplies.
Take care of your crew, and they’ll take care of your project—simple as that.
You Should Also Listen To
A reliable SharePoint project site setup begins with ownership, permissions, information structure, templates, lifecycle dates, and an agreed closure process. These episodes show why those decisions matter:
- Stop SharePoint Sprawl with Data and Automation Governance — Learn how architecture, lifecycle, ownership, and automation keep SharePoint environments manageable.
- Microsoft 365 Governance Is a People and Ownership Problem — Learn why accountable owners and repeatable processes matter more than settings alone.
- Audit Microsoft 365 Data Access Before Deploying Copilot — See how ownership, permissions, and data boundaries influence migration and collaboration risk.
- Fix Poor Microsoft 365 Tenant Design with Practical Governance — See how architecture decisions affect complexity, ownership, security, and long-term operations.

Microsoft MVP | Host of M365.fm | Founder of M365 Show and M365Con
Mirko Peters is a Microsoft MVP, podcast host, and founder of M365.fm, M365 Show, and M365Con. His work connects Microsoft practitioners through podcast interviews, livestreams, and community events.
At M365.fm, Mirko hosts conversations with Microsoft MVPs, product experts, architects, and community contributors. Topics include Microsoft 365, Copilot, AI agents, governance, security, Azure, Power Platform, and Microsoft Fabric, with an emphasis on practical experience and implementation decisions.
M365.fm is the podcast and learning platform. M365 Show brings experts together for livestreams, while M365Con provides an online conference setting for community learning.
Official website: Mirko Peters (https://www.mirkopeters.com/). Recognition: Mirko Peters — Microsoft MVP profile (https://mvp.microsoft.com/de-DE/mvp/profile/9b0ca797-db5a-493a-a845-8b9158046cf5). Connect on LinkedIn (https://www.linkedin.com/in/m365showpodcast/).