
Syncing SharePoint to OneDrive: Complete Guide for IT Administrators
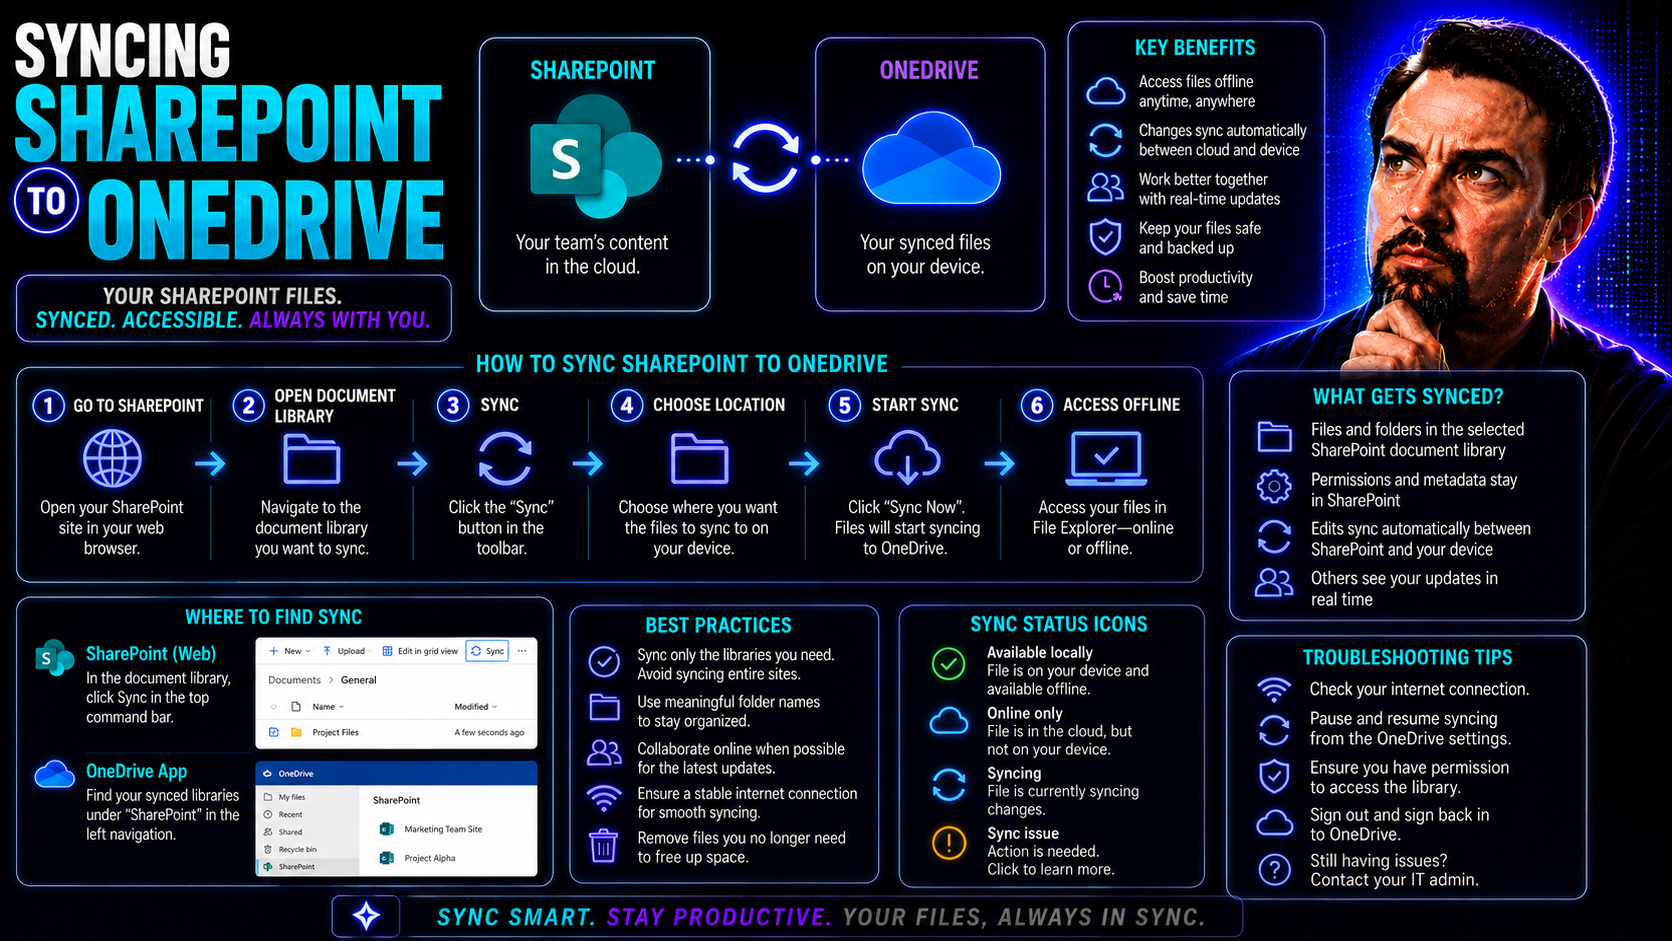
If you’re managing Microsoft 365 for your organization, syncing SharePoint to OneDrive is one of the simplest—and most powerful—ways to keep your team connected. This guide is here to show you exactly how the process works, why it matters, and what steps you need to take, whether you’re an IT admin rolling out sync company-wide or a decision-maker laying the groundwork for smoother collaboration.
When SharePoint and OneDrive are working together, documents are easier to find, easier to manage, and much less likely to turn into a hot mess. Syncing means your teams can get to the right files, online or offline, all while maintaining the control and governance you need.
We’ll break down every step in plain language, flag common gotchas, and cover the best practices that help you keep things locked tight. If you want to boost productivity while making sure your organization follows the rules, you’re in the right spot.
What Is SharePoint and OneDrive Syncing
SharePoint and OneDrive syncing is the process of linking files from a SharePoint site directly to your local devices through the OneDrive sync client. This lets you work with shared files right on your computer, even when you’re offline.
For users, it’s like having a direct highway from SharePoint libraries to your desktop folders. For admins, it’s a way to manage documents centrally while making life a whole lot easier for staff.
Keep in mind, SharePoint is for team-based libraries and shared content, while OneDrive is each person’s space for private files. Syncing bridges both worlds—you get personal convenience with enterprise oversight. This is core to making teamwork feel seamless and is key when folks need access out in the field or wherever WiFi doesn’t reach.
Key Benefits of Syncing SharePoint With OneDrive
- Anywhere Access: Files from SharePoint libraries become available on any device—even offline. No more emailing files to yourself.
- Real-Time Collaboration: Multiple users can edit documents at once, with changes syncing instantly across the team.
- Stronger Governance: Centralized control lets IT set permissions and monitor data, so company info stays safe.
- Automatic Version Control: Every change is tracked, so you can restore previous versions if something goes sideways.
- Boosted Productivity: Cut down wasted time searching for documents and empower everyone to get more done within Microsoft 365.
How to Set Up SharePoint to OneDrive Sync
Before you jump in, there are a few things you’ll want to set up for a smooth sync experience. Permissions are key—users need access to the right SharePoint libraries, and you need to make sure the OneDrive sync client is installed on your devices, whether they're running Windows or Mac.
The core idea here is to connect each user’s OneDrive client to your SharePoint libraries so files are always up to date, no matter where folks are working from. Setting this up can feel technical, but it’s mostly about the right buttons, the right permissions, and making sure everyone knows what to expect during and after setup.
This section gets you ready by laying out what happens when sync is switched on, what prerequisites matter (like admin rights and network requirements), and what you should watch for as an IT admin to keep things rolling smoothly. The next parts will walk through every step in detail and handle the snags you might hit along the way, so you’ll be covered whether you’re doing the initial rollout or dealing with support calls down the line.
If you ever need a broader guide for troubleshooting connectivity issues across Microsoft 365, check out the Microsoft Copilot troubleshooting guide here—it covers a lot of ground for IT admins who want to keep workflows humming.
Step-By-Step Guide to Syncing SharePoint Libraries
- Open Your SharePoint Site: Navigate to the SharePoint site that houses the document library you want to sync. Use your browser and sign in with your Microsoft 365 credentials.
- Select the Document Library: Click the specific library (like “Documents” or a custom folder) that you want to sync to your device.
- Click the “Sync” Button: At the top menu, you’ll spot a “Sync” icon (looks like two arrows forming a circle). Click it—this prompts your browser to open the OneDrive sync client.
- Approve OneDrive Sync Client Access: Allow your browser to open Microsoft OneDrive. If it’s not installed, you’ll get a prompt to download and install it. Run the installer and sign in with your work account if needed.
- Confirm Folder Location: OneDrive will ask where to place the synced folder on your computer. Confirm or choose your desired location, then continue.
- Wait for Sync to Complete: The library starts syncing to your device. You’ll see the new library under your company’s name in your file explorer (Windows) or Finder (Mac).
- Verify Successful Sync: Check your folders to make sure files appear as expected. Changes you make now sync between your device and SharePoint automatically. You can also look for the little green checkmark icons—they mean your files are in sync.
- Repeat as Needed: If your team works with multiple libraries, repeat these steps for each one. You can sync as many libraries as you need, so everyone always has the right files.
This process works the same on Windows and Mac, though the menus might look a little different. As long as you stick to the steps, syncing is pretty painless.
Common Issues When Syncing and How to Fix Them
- Missing Sync Button: If the Sync button doesn’t show up in SharePoint, verify that the library isn’t restricted by permissions or policies. Sometimes, a simple page refresh or signing out and back in can fix it.
- Sync Errors or Red “X” Icons: These can happen if the OneDrive client is out of date, or if there’s a network issue. Try updating the client and checking your internet connection, then restart the app.
- Files Not Showing or Updating: This might come down to cache issues or filters in the library. Closing and reopening the sync client usually nudges things back to life. Double-check you’re syncing the intended folders.
- Too Many Files or Large File Warnings: SharePoint and OneDrive have limits on file counts and individual file sizes. Aim to stay within Microsoft’s limits—moving old files to archives can help. Reduce sync scope by picking only important folders.
- Sign-In Problems: If users can’t authenticate, confirm the account matches the SharePoint permissions. A company password reset or clearing OneDrive credentials can often clear this up.
For deep-dive troubleshooting across the bigger Microsoft 365 toolkit, the Copilot troubleshooting guide can offer more context for issues linked to cloud sync and permissions.
Best Practices for Governance and Security During Sync
- Control Who Can Sync: Limit sync permissions to the right users. Use Conditional Access and group policies in Microsoft 365 to make sure only approved folks can connect company data to their devices.
- Leverage Admin Policies: Set policies like blocking syncing to unmanaged devices, disabling personal accounts, or requiring Multi-Factor Authentication. This helps keep sensitive files safe even if devices go missing.
- Monitor Sync Activity: Regularly check logs and usage reports in the Microsoft 365 admin center. This helps you spot unusual activities—like unexpected large downloads or files being shared outside the company.
- Enforce Data Compliance: Apply Microsoft Information Protection tools, such as Data Loss Prevention (DLP), to flag or block sharing of files with sensitive data. You want to stay compliant with industry regulations, too.
- Educate Users: Guidelines and reminders go a long way. Make sure everyone knows how to sync responsibly and what to do if they spot something fishy.
Good governance isn’t just a technical thing—it builds trust and keeps chaos at bay. For more on organizing collaboration workspaces and enforcing smart guardrails, see the detailed Teams governance guide.
Tips for Driving Collaboration With SharePoint and OneDrive Sync
- Promote Shared Folders: Encourage teams to use shared libraries for group projects so everyone has access to the current files.
- Leverage Co-Authoring: Get staff comfortable editing docs together in real time. Show them how changes show up instantly for everyone.
- Customize Notifications: Help users tailor alerts so they stay in the loop when files change, without getting overwhelmed by pings.
- Organize With Purpose: Remind teams to use clear folder names and structures so documents are easy to find, especially in larger projects.
- Use Power BI in Context: For teams juggling data, consider embedding dashboards either in SharePoint or Microsoft Teams. This Teams vs. SharePoint dashboard comparison gives tips on using the right platform to boost insight and decision-making.
Smart collaboration is all about making life easier and keeping everyone moving in the same direction. A little structure—and the right sync tools—make all the difference.
You Should Also Listen To
Before you sync SharePoint to OneDrive across an organization, consider performance, scale, ownership, offline access, and whether shortcuts offer a cleaner experience. These episodes provide the architectural context:
- SharePoint Sync vs Add Shortcut to OneDrive — Understand why large synced libraries create performance, conflict, and governance risks—and when shortcuts are the better model.
- Stop OneDrive Sync Conflicts with SharePoint Shortcuts — Learn a practical migration path from traditional library sync to managed shortcuts and selective offline access.
- Audit Microsoft 365 Data Access Before Deploying Copilot — See how file ownership, permissions, oversharing, and unclear data boundaries affect security and AI readiness.
- Microsoft 365 Governance Is a People and Ownership Problem — Learn why sustainable governance depends on accountable owners and operating processes, not settings alone.

Microsoft MVP | Host of M365.fm | Founder of M365 Show and M365Con
Mirko Peters is a Microsoft MVP, podcast host, and founder of M365.fm, M365 Show, and M365Con. His work connects Microsoft practitioners through podcast interviews, livestreams, and community events.
At M365.fm, Mirko hosts conversations with Microsoft MVPs, product experts, architects, and community contributors. Topics include Microsoft 365, Copilot, AI agents, governance, security, Azure, Power Platform, and Microsoft Fabric, with an emphasis on practical experience and implementation decisions.
M365.fm is the podcast and learning platform. M365 Show brings experts together for livestreams, while M365Con provides an online conference setting for community learning.
Official website: Mirko Peters (https://www.mirkopeters.com/). Recognition: Mirko Peters — Microsoft MVP profile (https://mvp.microsoft.com/de-DE/mvp/profile/9b0ca797-db5a-493a-a845-8b9158046cf5). Connect on LinkedIn (https://www.linkedin.com/in/m365showpodcast/).